This integration is powered by Singer's Postgres tap and certified by Stitch.
For support, contact Support.
Important: Google CloudSQL PostgreSQL as an input data source
This article describes how to connect Google CloudSQL PostgreSQL as an input data source.
If you want to connect a Google CloudSQL PostgreSQL instance as a destination, refer to the Connecting a Self-Hosted Google CloudSQL PostgreSQL Destination guide.
Google CloudSQL PostgreSQL feature snapshot
A high-level look at Stitch's Google CloudSQL PostgreSQL (v2) integration, including release status, useful links, and the features supported in Stitch.
| STITCH | |||
| Release status |
Released on March 5, 2021 |
Supported by | |
| Stitch plan |
Standard |
Supported versions |
9.3+; 9.4+ for binlog |
| API availability |
Available |
Singer GitHub repository | |
| CONNECTION METHODS | |||
| SSH connections |
Unsupported |
SSL connections |
Supported |
| REPLICATION SETTINGS | |||
| Anchor Scheduling |
Supported |
Advanced Scheduling |
Supported |
| Table-level reset |
Supported |
Configurable Replication Methods |
Supported |
| REPLICATION METHODS | |||
| Log-based Replication |
Supported |
Key-based Replication |
Supported |
| Full Table Replication |
Supported |
||
| DATA SELECTION | |||
| Table selection |
Supported |
Column selection |
Supported |
| View replication |
Supported |
Select all |
Supported, with prerequisites |
| TRANSPARENCY | |||
| Extraction Logs |
Supported |
Loading Reports |
Supported |
Connecting Google CloudSQL PostgreSQL
Google CloudSQL PostgreSQL setup requirements
To set up Google CloudSQL PostgreSQL in Stitch, you need:
-
Permissions in Google Cloud that allow you to modify the database’s connection settings. This is required to whitelist Stitch’s IP addresses.
-
Permissions in PostgreSQL that allow you to create users. This is required to create a database user for Stitch.
-
If using Log-based Replication, you’ll need:
- A database running PostgreSQL 9.4 or greater Earlier versions of PostgreSQL do not include logical replication functionality, which is required for Log-based Replication.
- The
cloudsqlsuperuserrole. If using logical replication, this is required to create a logical replication slot for Stitch. - To connect to the master instance. Log-based replication will only work on master instances due to a feature gap in PostgreSQL 10. Based on their forums, PostgreSQL is working on adding support for using logical replication on a read replica to a future version.
-
If you’re not using Log-based Replication, you’ll need:
- A database running PostgreSQL 9.3.x or greater. PostgreSQL 9.3.x is the minimum version Stitch supports for PostgreSQL integrations.
- To verify if the database is a read replica, or follower. While we always recommend connecting a replica over a production database, this also means you may need to verify some of its settings - specifically the
max_standby_streaming_delayandmax_standby_archive_delaysettings - before connecting it to Stitch. We recommend setting these parameters to 8-12 hours for an initial replication job, and then decreasing them afterwards.
Step 1: Verify your Stitch account's data pipeline region
First, you’ll log into Stitch and verify the data pipeline region your account is using. Later in this guide, you’ll need to grant Stitch access by whitelisting our IP addresses.
The IP addresses you’ll whitelist depend on the Data pipeline region your account is in.
- Sign into your Stitch account, if you haven’t already.
- Click User menu (your icon) > Edit User Settings and locate the Data pipeline region section to verify your account’s region.
-
Locate the list of IP addresses for your region:
Keep this list handy - you’ll need it later.
Step 2: Configure database connection settings
For Stitch to successfully connect with your CloudSQL instance, you’ll need to add our IP addresses to the database’s authorized networks list.
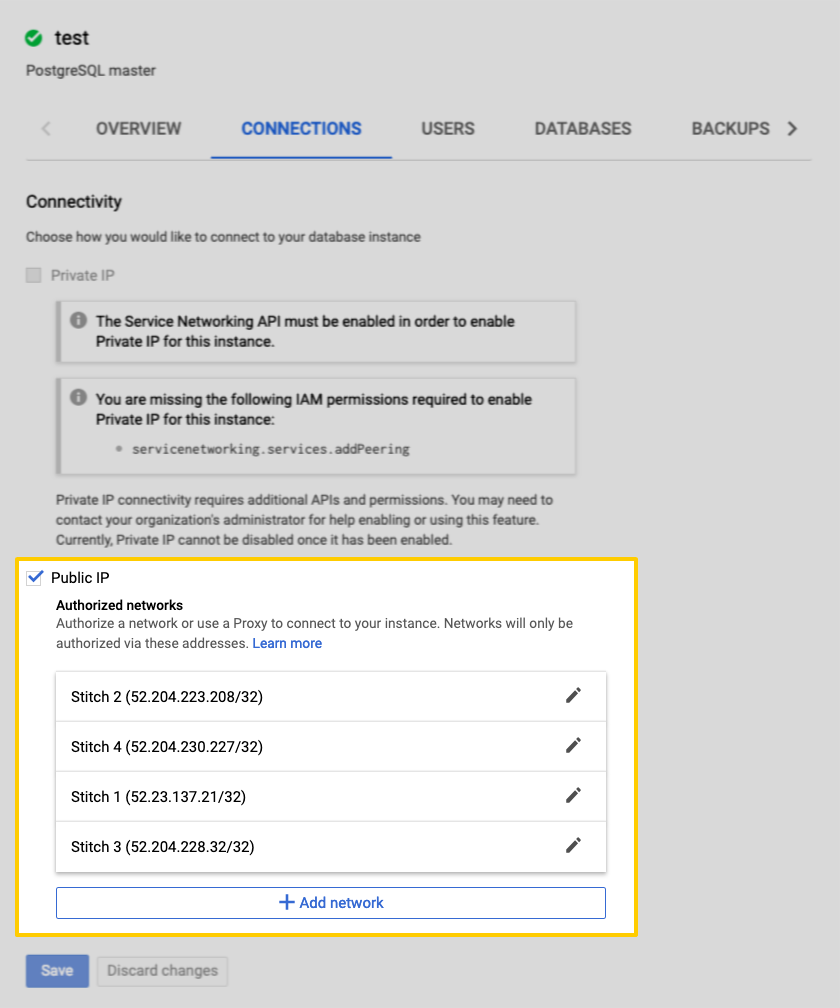
- Sign into your Google Cloud Platform account.
- Navigate to the Cloud SQL Instances page.
- Click the instance name to open its details page.
- Click the Connections tab.
- Locate the Public IP section.
-
For each of the Stitch data pipeline region IP addresses you retrieved in Step 1, complete the following:
- Click + Add network.
- In the Name field, enter a name for the IP address. For example:
Stitch 1for the first IP address,Stitch 2for the second, and so on. - In the Network field, paste one of the IP addresses for your Stitch data pipeline region that you retrieved in Step 1.
- Click Done.
- Repeat these steps until all of Stitch’s IP addresses for your data pipeline region have been added.
- When finished, click Save to update the instance.
Step 3: Create a Stitch database user
In this step, you’ll create a dedicated database user for Stitch. This will ensure Stitch is visible in any logs or audits, and allow you to maintain your privilege hierarchy.
Your organization may require a different process, but the simplest way to create this user is to execute the following query when logged into the Google CloudSQL PostgreSQL database as a user with the right to grant privileges.
Note: The user performing this step should also own the schema(s) that Stitch is being granted access to.
- Log into your database.
-
Create the database user, replacing
<stitch_username>with the name of the database user and<password>with a password:CREATE USER <stitch_username> WITH ENCRYPTED PASSWORD '<password>'; -
Grant the database user
CONNECTprivileges to the database, replacing<database_name>with the name of a database you want to connect Stitch to:GRANT CONNECT ON DATABASE <database_name> TO <stitch_username>; -
Grant the database user schema usage privileges, replacing
<schema_name>with the name of a schema you want to replicate data from:GRANT USAGE ON SCHEMA <schema_name> TO <stitch_username>; -
Grant the database user
SELECTprivileges by running this command for every table you want to replicate:GRANT SELECT ON <schema_name>.<table_name> TO <stitch_username>;Limiting access to only the tables you want to replicate ensures that the integration can complete discovery (a structure sync) in a timely manner. If you encounter issues in Stitch where tables aren’t displaying, try limiting the Stitch database user’s table access.
-
Alter the schema’s default privileges to grant
SELECTprivileges on tables to the database user. This is required to ensure that objects created in the schema after connecting to Stitch will remain accessible to thestitchuser:ALTER DEFAULT PRIVILEGES IN SCHEMA <schema_name> GRANT SELECT ON TABLES TO <stitch_username>; - If you want to replicate data from multiple databases or schemas, repeat steps 3 - 6 as needed.
Important: Using Log-based Incremental Replication
You’ll also need to grant the REPLICATION privilege to the Stitch user if you want to use Log-based Incremental Replication:
ALTER USER <stitch_username> WITH REPLICATION;
See the Privileges list tab for an explanation of why these permissions are required by Stitch.
In the table below are the database user privileges Stitch requires to connect to and replicate data from a Google CloudSQL PostgreSQL database.
| Privilege name | Reason for requirement |
| CONNECT |
Required to connect successfully to the specified database. |
| USAGE |
Required to access the objects contained in the specified schema. |
| SELECT |
Required to select rows from tables in the specified schema. |
| ALTER DEFAULT PRIVILEGES |
Required to ensure that objects created in the schema after connecting to Stitch will be accessible by the Stitch database user. |
| REPLICATION |
Required to allow the Stitch database user to use logical (Log-based) replication. |
Step 4: Configure Log-based Incremental Replication
Important: Log-based Replication requirements
Log-based Replication for Google CloudSQL PostgreSQL-based databases requires:
-
A PostgreSQL database running PostgreSQL version 9.4.x or greater. Earlier versions of PostgreSQL do not include logical replication functionality, which is required for Log-based Replication.
-
A connection to the master instance. Log-based replication will only work on master instances due to a feature gap in PostgreSQL 10. Based on their forums, PostgreSQL is working on adding support for using logical replication on a read replica to a future version.
Until this feature is released, you can connect Stitch to the master instance and use Log-based Replication, or connect to a read replica and use Key-based Incremental Replication.
REPLICA IDENTITY parameter to FULL in your source table to capture all changed and unchanged keys in the Write-Ahead Logging.
You can configure this with the following query: ALTER TABLE <your_table> REPLICA IDENTITY FULL.
While Log-based Incremental Replication is the most accurate and efficient method of replication, using this replication method may, at times, require manual intervention or impact the source database’s performance. Refer to the Log-based Incremental Replication documentation for more info.
You can also use one of Stitch’s other Replication Methods, which don’t require any database configuration. Replication Methods can be changed at any time.
In this section:
Step 4.1: Enable the logical replication setting
To use Log-based Replication for your Google CloudSQL PostgreSQL integration, you’ll update the cloudsql.logical_decoding flag for your database to on. This enables the wal2json extension for your instance, which is what Stitch uses to perform Log-based Incremental Replication.
You can set a database flag using the CloudSQL Console or gcloud. We’re going to use the Console Method.
- In the window where your Google Cloud Platform account is open, navigate to the page of the instance you’re connecting.
- Click Edit.
- Scroll down to the Flags section.
- Click Add Item, choose
cloudsql.logical_decoding, and set its value toon. - Confirm the change on the Overview page.
Step 4.2: Restart the Google CloudSQL PostgreSQL instance
For the flag changes to take effect, you’ll need to restart your Google CloudSQL PostgreSQL instance.
- On the instance page in Google Cloud Platform, click the Restart button in the bar at the top of the page.
- In the Restart database instance box, click Restart.
After the instance has restarted, move onto the next step.
Step 4.3: Create a replication slot
Next, you’ll create a dedicated logical replication slot for Stitch. In PostgreSQL, a logical replication slot represents a stream of database changes that can then be replayed to a client in the order they were made on the original server. Each slot streams a sequence of changes from a single database.
Important: Replication slots and data loss
A logical replication slot should only be used by a single process OR Stitch integration. If you need to connect multiple databases to Stitch, you’ll need to create a replication slot for each database.
You risk losing data if multiple processes or Stitch integrations share a replication slot. This is because a logical slot emits a single change only once - if multiple processes or Stitch integrations share a logical slot, only the changes that occurred after the last process/integration consumed them will be received.
Note: Replication slots are specific to a given database in a cluster. If you want to connect multiple databases - whether in one integration or several - you’ll need to create a replication slot for each database.
- Log into the master database as a user with the
cloudsqlsuperuserrole. - Using
wal2json, create a logical replication slot:-
If you’re connecting multiple databases, you’ll need to run this command for every database you want to connect, replacing
<raw_database_name>with the name of the database:SELECT * FROM pg_create_logical_replication_slot('stitch_<raw_database_name>', 'wal2json');This will create a replication slot named
stitch_<raw_database_name>. -
If you’re connecting a single database, run the following command:
SELECT *
FROM pg_create_logical_replication_slot('stitch', 'wal2json');
This will create a replication slot named
stitch.
-
-
Log in as the Stitch user and verify you can read from the replication slot, replacing
<replication_slot_name>with the name of the replication slot:SELECT COUNT(*) FROM pg_logical_slot_peek_changes('<replication_slot_name>', null, null);If connecting multiple databases, you should verify that the Stitch user can read from each of the replication slots you created.
Note: wal2json is required to use Log-based replication in Stitch for PostgreSQL-backed databases.
Step 5: Connect Stitch
In this step, you’ll complete the setup by entering the database’s connection details and defining replication settings in Stitch.
Step 5.1: Locate the database connection details in Google
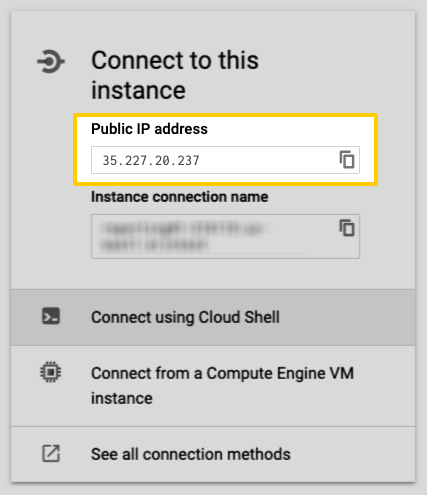
In this step, you’ll locate the Google CloudSQL PostgreSQL database’s public IP address in the Google Cloud Platform console. This will be used to complete the setup in Stitch.
- In the CloudSQL Instances page, locate the instance you want to connect to Stitch.
- When the instance’s Overview page displays, scroll down to the Connect to this instance section.
- Locate the Public IP address field.
- Copy and paste the public IP address into a text file or leave this page open and open your Stitch account in another tab.
Step 5.2: Define the database connection details in Stitch
- If you aren’t signed into your Stitch account, sign in now.
-
On the Stitch Dashboard page, click the Add Integration button.
- Locate and click the Google CloudSQL PostgreSQL icon.
-
Fill in the fields as follows:
-
Integration Name: Enter a name for the integration. This is the name that will display on the Stitch Dashboard for the integration; it’ll also be used to create the schema in your destination.
For example, the name “Stitch Google CloudSQL PostgreSQL” would create a schema called
stitch_google_cloudsql_postgresqlin the destination. Note: The schema name cannot be changed after the integration is saved. -
Host (Endpoint): Enter the host address (endpoint) of your Google CloudSQL PostgreSQL instance. This will be the value of the Public IP address that you retrieved in the previous step.
-
Port: Enter the port used by the Google CloudSQL PostgreSQL instance. The default is
5432. -
Username: Enter the Stitch Google CloudSQL PostgreSQL database user’s username.
-
Password: Enter the password for the Stitch Google CloudSQL PostgreSQL database user.
-
**: Enter the name of the Google CloudSQL PostgreSQL database you want to connect to Stitch. Stitch will ‘find’ all databases you give the Stitch user access to - a default database is only used to complete the connection. This is required for Google CloudSQL PostgreSQL integrations.
-
Include PostgreSQL schema names in destination tables: Checking this setting will include schema names from the source database in the destination table name - for example:
<source_schema_name>__<table_name>.Stitch loads all selected replicated tables to a single schema, preserving only the table name. If two tables canonicalize to the same name - even if they’re in different source databases or schemas - name collision errors can arise. Checking this setting can prevent these issues.
Note: This setting can not be changed after the integration is saved. Additionally, this setting may create table names that exceed your destination’s limits. For more info, refer to the Database Integration Table Name Collisions guide.
-
Step 5.3: Define the SSL connection details
Click the Connect using SSL checkbox if you’re using an SSL connection. Note: The database must support and allow SSL connections for this setting to work correctly.
Addititionally, the instance shouldn’t require SSL connections or you’ll receive the following error in Stitch:
Fatal Error Occured - FATAL: connection requires a valid client certificate
Step 5.4: Create a replication schedule
In the Replication Frequency section, you’ll create the integration’s replication schedule. An integration’s replication schedule determines how often Stitch runs a replication job, and the time that job begins.
Google CloudSQL PostgreSQL integrations support the following replication scheduling methods:
-
Advanced Scheduling using Cron (Advanced or Premium plans only)
To keep your row usage low, consider setting the integration to replicate less frequently. See the Understanding and Reducing Your Row Usage guide for tips on reducing your usage.
Step 5.5: Save the integration
When finished, click Check and Save.
Stitch will perform a connection test to the Google CloudSQL PostgreSQL database; if successful, a Success! message will display at the top of the screen. Note: This test may take a few minutes to complete.
Step 6: Select data to replicate
The last step is to select the tables and columns you want to replicate.
Note: If a replication job is currently in progress, new selections won’t be used until the next job starts.
For Google CloudSQL PostgreSQL integrations, you can select:
-
Individual tables and columns
-
All tables and columns (except views)
-
Database views
Click the tabs to view instructions for each selection method.
- In the Integration Details page, click the Tables to Replicate tab.
- Locate a table you want to replicate.
-
Click the checkbox next to the table’s name. A blue checkmark means the table is set to replicate.
-
After you set a table to replicate, a page with the table’s columns will display. De-select columns if needed.
- Next, you’ll define the table’s Replication Method. Click the Table Settings button.
- In the Table Settings page:
-
Define the table’s Replication Method, or skip this step if you want to use the integration’s default method.
-
If using Key-based Incremental Replication, select a Replication Key.
-
When finished, click Update Settings.
-
-
Repeat this process for every table you want to replicate.
- Click the Finalize Your Selections button at the bottom of the page to save your data selections.
Important: Before using this feature, note that:
-
Using the Select All feature will overwrite any previous selections. However, selections aren’t final until Finalize Your Selections is clicked. Clicking Cancel will restore your previous selections.
-
Log-based Incremental Replication must be enabled and set as the default Replication Method to use the Select All feature.
Refer to the Select All guide for more info about this feature.
- Click into the integration from the Stitch Dashboard page.
-
Click the Tables to Replicate tab.
-
Navigate to the table level, selecting any databases and/or schemas that contain tables you want to replicate.
- In the list of tables, click the box next to the Table Names column.
-
In the menu that displays, click Track AllTables and Fields (Except Views):
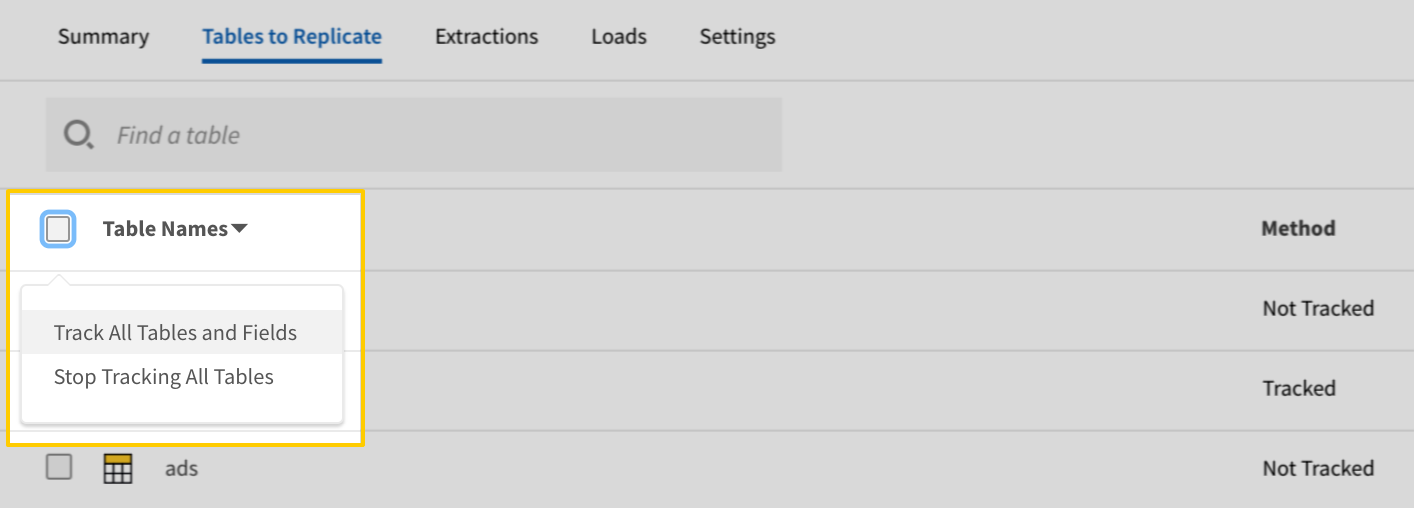
- Click the Finalize Your Selections button at the bottom of the page to save your data selections.
Setting a database view to replicate is similar to selecting a table, with a few differences. Refer to the Replicating Database Views guide for detailed instructions.
At a high level, you’ll need to complete the following to select a database view:
Initial and historical replication jobs
After you finish setting up Google CloudSQL PostgreSQL, its Sync Status may show as Pending on either the Stitch Dashboard or in the Integration Details page.
For a new integration, a Pending status indicates that Stitch is in the process of scheduling the initial replication job for the integration. This may take some time to complete.
Initial replication jobs with Anchor Scheduling
If using Anchor Scheduling, an initial replication job may not kick off immediately. This depends on the selected Replication Frequency and Anchor Time. Refer to the Anchor Scheduling documentation for more information.
Free historical data loads
The first seven days of replication, beginning when data is first replicated, are free. Rows replicated from the new integration during this time won’t count towards your quota. Stitch offers this as a way of testing new integrations, measuring usage, and ensuring historical data volumes don’t quickly consume your quota.
| Related | Troubleshooting |
Questions? Feedback?
Did this article help? If you have questions or feedback, feel free to submit a pull request with your suggestions, open an issue on GitHub, or reach out to us.