Oracle integrations are an upgraded feature
Oracle integrations are an upgraded feature that’s available for customers on an Advanced or Premium plan. It is not available by default during the free trial, but it can be enabled if needed.
For more info about Stitch Advanced, contact the Stitch Sales team.
This integration is powered by Singer's Oracle tap and certified by Stitch. Check out and contribute to the repo on GitHub.
For support, contact Support.
Amazon Oracle RDS feature snapshot
A high-level look at Stitch's Amazon Oracle RDS (v1) integration, including release status, useful links, and the features supported in Stitch.
| STITCH | |||
| Release status |
Released on August 1, 2018 |
Supported by | |
| Stitch plan |
Advanced |
Supported versions |
8.0 - 18c |
| API availability |
Available |
Singer GitHub repository | |
| CONNECTION METHODS | |||
| SSH connections |
Supported |
SSL connections |
Unsupported |
| REPLICATION SETTINGS | |||
| Anchor Scheduling |
Supported |
Advanced Scheduling |
Supported |
| Table-level reset |
Supported |
Configurable Replication Methods |
Supported |
| REPLICATION METHODS | |||
| Log-based Replication |
Supported |
Key-based Replication |
Supported |
| Full Table Replication |
Supported |
||
| DATA SELECTION | |||
| Table selection |
Supported |
Column selection |
Supported |
| View replication |
Supported |
Select all |
Supported, with prerequisites |
| TRANSPARENCY | |||
| Extraction Logs |
Supported |
Loading Reports |
Supported |
Connecting Amazon Oracle RDS
Amazon Oracle RDS setup requirements
To set up Amazon Oracle RDS in Stitch, you need:
- A Stitch Advanced plan.
-
Privileges in Amazon Web Services (AWS) that allow you to:
- Create/manage Security Groups. This is required to whitelist Stitch’s IP addresses.
- Modify database instances. This is required to enable settings required for incremental replication.
- View database details. This is required to retrieve the database’s connection details.
-
Privileges in the Amazon Oracle RDS database that allow you to:
-
Access the
V$DATABASEandV_$THREADperformance views. These are required to verify setting configuration while setting up your Amazon Oracle RDS database and to retrieve the database’s Oracle System ID. Refer to Amazon Oracle RDS’s documentation for more info on performance views. -
Create users and grant privileges. The
CREATE USERandGRANTprivileges are required to create a database user for Stitch and grant the necessary privileges to the user. -
GRANTaccess to the objects you want to replicate. This is necessary to grant the privileges necessary for selecting data to the Stitch database user. Refer to Amazon Oracle RDS’s documentation for more info.
-
-
If using Log-based Incremental Replication, you need:
- A database using Oracle 8.0 through 18c. Versions earlier than 8.0 and later than 18c don’t include LogMiner functionality, which is required for Log-based Incremental Replication.
Step 1: Verify your Stitch account's data pipeline region
First, you’ll log into Stitch and verify the data pipeline region your account is using. Later in this guide, you’ll need to grant Stitch access by whitelisting our IP addresses.
The IP addresses you’ll whitelist depend on the Data pipeline region your account is in.
- Sign into your Stitch account, if you haven’t already.
- Click User menu (your icon) > Edit User Settings and locate the Data pipeline region section to verify your account’s region.
-
Locate the list of IP addresses for your region:
Keep this list handy - you’ll need it later.
Step 2: Configure database connection settings
In this step, you’ll configure the database server to allow traffic from Stitch to access it. There are two ways to connect your database:
- A direct connection will work if your database is publicly accessible.
- An SSH tunnel is required if your database isn’t publicly accessible. This method uses a publicly accessible instance, or an SSH server, to act as an intermediary between Stitch and your database. The SSH server will forward traffic from Stitch through an encrypted tunnel to the private database.
Click the option you’re using below and follow the instructions.
For Stitch to successfully connect with your database instance, you’ll need to add our IP addresses to the appropriate Security Group via the AWS management console.
Security Groups must reside in the same VPC as the instance. Use the instructions below to create a security group for Stitch and grant access to the VPC.
- Log into your AWS account.
- Navigate to the Security Group Management page, typically Services > Compute > EC2.
- Click the Security Groups option, under Network & Security in the menu on the left side of the page.
- Click Create Security Group.
- In the window that displays, fill in the fields as follows:
- Security group name: Enter a unique name for the Security Group. For example:
Stitch - Description: Enter a description for the security group.
- VPC: Select the VPC that contains the database you want to connect to Stitch. Note: The Security Group and database must be in the same VPC, or the connection will fail.
- Security group name: Enter a unique name for the Security Group. For example:
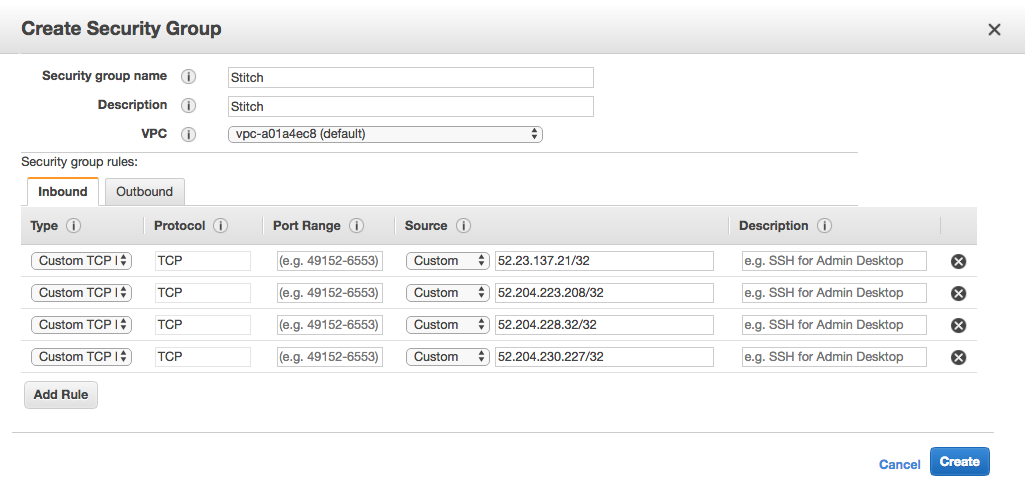
- In the Inbound tab, click Add Rule.
- Fill in the fields as follows:
- Type: Select
Custom TCP Rule - Port Range: Enter the port your database uses. (
1521by default) - CIDR, IP or Security Group: Paste one of the Stitch IP addresses for your Stitch data pipeline region that you retrieved in Step 1.
- Type: Select
- Click Add Rule to add an additional Inbound rule.
-
Repeat steps 6-8 until all the IP addresses for your Stitch data pipeline region have been added.
This is what a Security Group using Stitch’s North America IP addresses looks like:
- When finished, click Create to create the Security Group.
- Follow the steps in the Setting up an SSH Tunnel for a database in Amazon Web Services guide to set up an SSH tunnel for Amazon Oracle RDS.
- Complete the steps in this guide after the SSH setup is complete.
Step 3: Enable Log-based Incremental Replication with LogMiner
Note: Log-based Incremental Replication requirements and limitations
Before configuring Log-based Incremental Replication, note the following:
- Not all database versions are supported. Only Oracle databases using a version from 8.0 through 18c support LogMiner, which is required to use Log-based Incremental Replication in Stitch.
- Some data types may not be supported. Refer to the Data types section for more info.
Log-based Incremental Replication is the most efficient way to replicate Amazon Oracle RDS data. Stitch uses Oracle’s LogMiner package to query Oracle’s archive logs and retrieve all inserts, updates, and deletes to your database.
Step 3.1: Enable AWS automated backups
Note: This step requires:
- Privileges in AWS that allow you to modify database instances.
- Rebooting the database for changes to take effect. Perform this step during off-peak hours to minimize disruptions.
The backup retention period setting defines the number of days for which automated backups are retained. This ensures that data can still be replicated even if a job is interrupted, there’s database or Stitch downtime, etc.
- Sign into your AWS account.
- Once you’re signed into the AWS console, click the Services menu located in the top-left corner of the page.
- Locate the RDS option. This should be in the Database section.
-
From the RDS Dashboard, click Databases on the left side of the page.
- Select the instance you’re connecting to Stitch.
- Click the Modify button.
-
On the Modify DB Instance page, scroll down to the Backup section.
-
Set Backup retention period to anything greater than
1 day: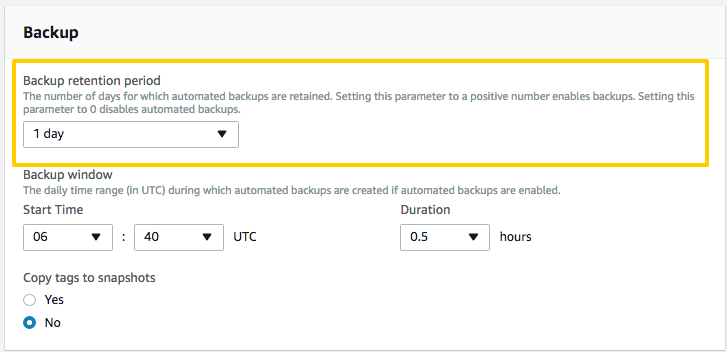
- Scroll to the bottom of the Databases page and click Continue.
- The next page will display a summary of the modifications made to the database. In the Scheduling of Modifications section, select the Apply Immediately option.
- Click Modify DB Instance to apply the changes.
-
Navigate to the Instance Details page and locate the Parameter group. Initially, the Parameter group should say
applying.When it changes to
pending-reboot, you can reboot the database and apply the changes. - Scroll up to the top of the page and locate the Instance actions menu.
- In this menu, click Reboot.
- On the next page, click Reboot to confirm you want to reboot the instance.
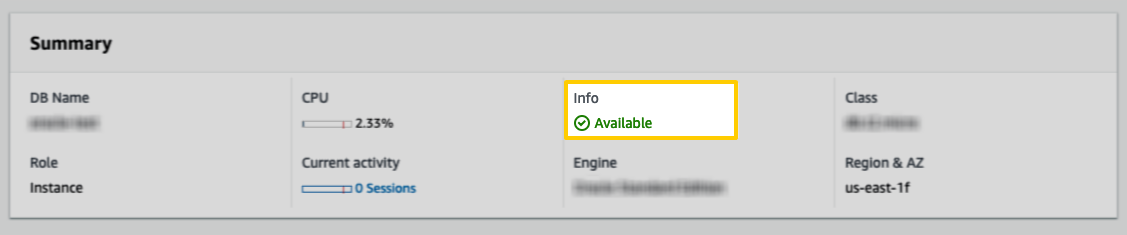
Rebooting the instance will take a few minutes. When the status of the parameter group changes to in-sync and the DB instance status (located at the top of the Instance Details page) changes to available, the reboot will be complete:
Step 3.2: Define ARCHIVELOG retention hours
In addition to the backup retention period, you also need to define the archivelog retention hours setting. This parameter specifies the number of hours the database server should retain archive logs.
To specify the number of hours, use the rdsadmin.rdsadmin_util.set_configuration procedure when logged into the Amazon Oracle RDS master instance.
In this example, archive logs will be retained for seven days (24 hours x 7 days = 168 hours):
exec rdsadmin.rdsadmin_util.set_configuration('archivelog retention hours',168);
Stitch recommends a minimum of three days for the retention period, but strongly recommends seven.
Step 3.3: Enable supplemental logging
In this step, you’ll enable supplemental logging for the database. This ensures that columns are logged in redo log files when changes are made to the database, which is required by Amazon Oracle RDS to use LogMiner. Refer to Amazon Oracle RDS’s documentation for more info about supplemental logging.
To enable supplemental logging, run:
exec rdsadmin.rdsadmin_util.alter_supplemental_logging('ADD','ALL');
The result should be PL/SQL procedure successfully completed.
Next, verify that supplemental logging was successfully enabled by running the following query:
SELECT SUPPLEMENTAL_LOG_DATA_MIN FROM V$DATABASE
If the result is YES, supplemental logging was successfully enabled.
Step 4: Create a Stitch Amazon Oracle RDS database user
CREATE USER and GRANT privileges in Amazon Oracle RDS.
Next, you’ll create a dedicated database user for Stitch. This will ensure Stitch is visible in any logs or audits and allow you to maintain your privilege hierarchy.
- If you aren’t already, log into your database as a user with
CREATE USERandGRANTprivileges. -
Run the following command to create the Stitch database user, replacing
<stitch_username>with the name of the database user and<password>with a secure password:CREATE USER STITCH IDENTIFIED BY <password> -
Grant the Stitch user the
CREATE SESSIONprivilege, which will allow Stitch to connect to the database:GRANT CREATE SESSION TO <stitch_username> -
Grant the Stitch user
SELECTprivileges on the following system tables:GRANT SELECT ON all_constraints to <stitch_username> GRANT SELECT ON all_cons_columns to <stitch_username> GRANT SELECT ON all_tab_columns to <stitch_username> GRANT SELECT ON all_tables to <stitch_username> GRANT SELECT ON all_views to <stitch_username> GRANT SELECT ON all_constraints to <stitch_username> GRANT SELECT ON SYS.V_$DATABASE TO <stitch_username> -
Grant the Stitch user
SELECTprivileges by running this command for every table you want to replicate:GRANT SELECT ON <schema_name>.<table_name> to <stitch_username>Limiting access to only the tables you want to replicate ensures that the integration can complete discovery (a structure sync) in a timely manner. If you encounter issues in Stitch where tables aren’t displaying, try limiting the Stitch database user’s table access.
Important: Using Log-based Incremental Replication
If you want to use Log-based Incremental Replication, you’ll also need to grant additional permissions to the Stitch user:
GRANT EXECUTE_CATALOG_ROLE TO <stitch_username>
GRANT SELECT ANY TRANSACTION TO <stitch_username>
GRANT SELECT ANY DICTIONARY TO <stitch_username>
GRANT EXECUTE ON DBMS_LOGMNR TO <stitch_username>
GRANT EXECUTE ON DBMS_LOGMNR_D TO <stitch_username>
GRANT SELECT ON SYS.V_$DATABASE TO <stitch_username>
GRANT SELECT ON SYS.V_$ARCHIVED_LOG TO <stitch_username>
If you’re using version 12 of Amazon Oracle RDS, you’ll also need to grant the LOGMINING privilege to the Stitch user:
GRANT LOGMINING TO <stitch_username>
See the Privileges list tab for an explanation of why these permissions are required by Stitch.
In the table below are the database user privileges Stitch requires to connect to and replicate data from a Amazon Oracle RDS database.
| Privilege name | Reason for requirement |
| CREATE SESSION |
Required to log into the Amazon Oracle RDS database. |
| SELECT |
Required to select data from specified tables. |
| EXECUTE_CATALOG_ROLE |
Required to use Log-based Incremental Replication. Required by Amazon Oracle RDS to access objects in the |
| EXECUTE ON DBMS_LOGMNR |
Required to use Log-based Incremental Replication. Allows the Stitch user to execute the |
| EXECUTE ON DBMS_LOGMNR_D |
Required to use Log-based Incremental Replication. Allows the Stitch user to execute the |
| SELECT ON SYS.V_$DATABASE |
Required to validate the database’s configuration settings (archiving mode, supplemental logging, etc). |
| SELECT ANY TRANSACTION |
Required to use Log-based Incremental Replication. Requied by Amazon Oracle RDS to query the |
| SELECT ANY DICTIONARY |
Required to select from system data dictionary objects. |
| SELECT ON SYS.V_$ARCHIVED_LOG |
Required to use Log-based Incremental Replication. Required to locate the start and end of extracted dictionaries in archived redo log files via the |
| SELECT ON SYS.V_$LOGMNR_CONTENTS |
Required to use Log-based Incremental Replication. Required to identify the redo log files to mine (read) via the |
| LOGMINING |
Required to use Log-based Incremental Replication if using Oracle version 12. In version 12 of Oracle, this privilege is required to use the |
Step 5: Retrieve the database's Oracle System ID
SYS.V_$THREAD performance view.
An Oracle System ID (SID) is used to uniquely identify a specific database in your system. When you connect an Amazon Oracle RDS database to Stitch, you’ll enter the SID of the database you want Stitch to extract data from into the Integration Settings page.
To retrieve your database’s SID, log into your database as a user with access to the SYS.V_$THREAD performance view and run the following:
SELECT INSTANCE FROM SYS.V_$THREAD
The value returned by the query will be the database’s SID. Keep this handy - you’ll need it to complete the setup.
Step 6: Connect Stitch
In this step, you’ll complete the setup by entering the database’s connection details and defining replication settings in Stitch.
Step 6.1: Locate the database connection details in AWS
- Sign into the AWS Console, if needed.
- Navigate to the RDS option.
-
On the RDS Dashboard page, click the Databases option on the left side of the page. This will open the RDS Databases page.
-
In the list of databases, locate and click on the instance you want to connect to Stitch. This will open the Database Details page.
-
On the Database Details page, scroll down to the Connectivity & security section.
- Locate the following fields:
- Endpoint
-
DB Name: This field contains the name of the database used to launch the instance. You’ll only need this info if you want to connect this specific database to Stitch.
You can connect this database to Stitch, or another database within Amazon Oracle RDS.
- Port: This is the port used by the database.
Leave this page open for now - you’ll need it to complete the setup.
Step 6.2: Define the database connection details in Stitch
- If you aren’t signed into your Stitch account, sign in now.
-
On the Stitch Dashboard page, click the Add Integration button.
- Locate and click the Oracle icon.
-
Fill in the fields as follows:
-
Integration Name: Enter a name for the integration. This is the name that will display on the Stitch Dashboard for the integration; it’ll also be used to create the schema in your destination.
For example, the name “Stitch Amazon Oracle RDS” would create a schema called
stitch_amazon_oracle_rdsin the destination. Note: The schema name cannot be changed after the integration is saved. -
Port: Enter the port used by the Amazon Oracle RDS instance. The default is
1521. -
Username: Enter the Stitch Amazon Oracle RDS database user’s username.
-
Password: Enter the password for the Stitch Amazon Oracle RDS database user.
-
Oracle System ID (SID): Enter the Oracle System ID (SID) of the database you retrieved in Step 5.
-
Step 6.3: Define the SSH connection details
If you’re using an SSH tunnel to connect your Amazon Oracle RDS database to Stitch, you’ll also need to define the SSH settings. Refer to the Setting up an SSH Tunnel for a database in Amazon Web Services guide for assistance with completing these fields.
-
Click the SSH Tunnel checkbox.
-
Fill in the fields as follows:
-
SSH Host: Paste the Public DNS of the SSH sever (EC2 instance) into this field. Refer to the Amazon SSH guide for instructions on retrieving this info.
-
SSH Port: Enter the SSH port of the SSH server (EC2 instance) into this field. This will usually be
22. -
SSH User: Enter the Stitch Linux (SSH) user’s username.
-
Step 6.4: Define the default replication method
In the Default Replication Method section, you’ll select a default Replication Method for the integration.
The method you select will be the default Replication Method for any table you set to replicate. You can change the Replication Method for individual tables in the Table Settings page for that table.
Select a default Replication Method:
-
Log-based Incremental Replication - Stitch will use Log-based Incremental Replication. Refer to the Log-based Incremental documentation for more info, examples, and limitations for this method.
-
Full Table Replication - Stitch will use Full Table Replication. Refer to the Full Table documentation for more info, examples, and limitations for this method.
Note: Key-based Incremental documentation is also available for this integration, but it must be set manually. This is due to Stitch requiring a Replication Key to be selected for every table set to replicate.
Step 6.5: Create a replication schedule
In the Replication Frequency section, you’ll create the integration’s replication schedule. An integration’s replication schedule determines how often Stitch runs a replication job, and the time that job begins.
Amazon Oracle RDS integrations support the following replication scheduling methods:
-
Advanced Scheduling using Cron (Advanced or Premium plans only)
To keep your row usage low, consider setting the integration to replicate less frequently. See the Understanding and Reducing Your Row Usage guide for tips on reducing your usage.
Step 7: Select data to replicate
The last step is to select the tables and columns you want to replicate.
Note: If a replication job is currently in progress, new selections won’t be used until the next job starts.
For Amazon Oracle RDS integrations, you can select:
-
Individual tables and columns
-
All tables and columns (except views)
-
Database views
Click the tabs to view instructions for each selection method.
- In the Integration Details page, click the Tables to Replicate tab.
- Locate a table you want to replicate.
-
Click the checkbox next to the table’s name. A blue checkmark means the table is set to replicate.
-
After you set a table to replicate, a page with the table’s columns will display. De-select columns if needed.
- Next, you’ll define the table’s Replication Method. Click the Table Settings button.
- In the Table Settings page:
-
Define the table’s Replication Method, or skip this step if you want to use the integration’s default method.
-
If using Key-based Incremental Replication, select a Replication Key.
-
When finished, click Update Settings.
-
-
Repeat this process for every table you want to replicate.
- Click the Finalize Your Selections button at the bottom of the page to save your data selections.
Important: Before using this feature, note that:
-
Using the Select All feature will overwrite any previous selections. However, selections aren’t final until Finalize Your Selections is clicked. Clicking Cancel will restore your previous selections.
-
Log-based Incremental Replication must be enabled and set as the default Replication Method to use the Select All feature.
Refer to the Select All guide for more info about this feature.
- Click into the integration from the Stitch Dashboard page.
-
Click the Tables to Replicate tab.
-
Navigate to the table level, selecting any databases and/or schemas that contain tables you want to replicate.
- In the list of tables, click the box next to the Table Names column.
-
In the menu that displays, click Track AllTables and Fields (Except Views):
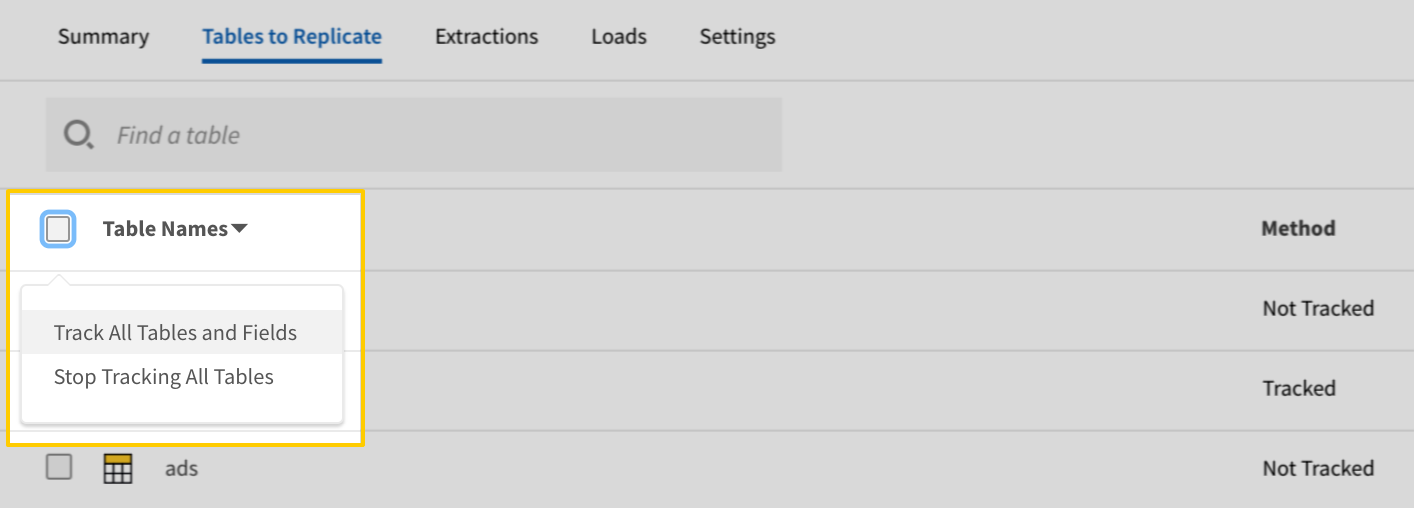
- Click the Finalize Your Selections button at the bottom of the page to save your data selections.
Setting a database view to replicate is similar to selecting a table, with a few differences. Refer to the Replicating Database Views guide for detailed instructions.
At a high level, you’ll need to complete the following to select a database view:
Initial and historical replication jobs
After you finish setting up Amazon Oracle RDS, its Sync Status may show as Pending on either the Stitch Dashboard or in the Integration Details page.
For a new integration, a Pending status indicates that Stitch is in the process of scheduling the initial replication job for the integration. This may take some time to complete.
Initial replication jobs with Anchor Scheduling
If using Anchor Scheduling, an initial replication job may not kick off immediately. This depends on the selected Replication Frequency and Anchor Time. Refer to the Anchor Scheduling documentation for more information.
Free historical data loads
The first seven days of replication, beginning when data is first replicated, are free. Rows replicated from the new integration during this time won’t count towards your quota. Stitch offers this as a way of testing new integrations, measuring usage, and ensuring historical data volumes don’t quickly consume your quota.
Amazon Oracle RDS replication
Overview of Log-based Incremental Replication using LogMiner
Stitch uses Amazon Oracle RDS’s LogMiner package to replicate data incrementally. This means that when Log-based Incremental is selected as the Replication Method for a table, Stitch will only replicate new or updated data for the table during each replication job.
To identify new and updated data, Stitch uses Amazon Oracle RDS’s Approximate Commit System Change Numbers, or SCNs, as Replication Keys. When reading from the database’s logs, records with an SCN value greater than the maximum SCN from the previous job will be replicated.
Refer to the Log-based Incremental Replication documentation for a more detailed explanation, examples, and the limitations associated with this replication method.
Data types
In the table below are the data types Amazon Oracle RDS integrations support and the Stitch data type it will map to, depending on the version of the integration being used:
- indicates that the data type is supported. Following the icon is the Stitch data type it will map to.
- indicates that the data type is supported, but there is additional information you should know. Hover over the icon to view a tooltip with the information.
- indicates that the data type isn't applicable to the integration. This is usually because the integration doesn't use that particular data type.
- indicates that the data type isn't supported. In Stitch, columns with unsupported data types will have Unavailable in the Type column of the Tables to Replicate tab.
Refer to the Data typing guide for more info about how Stitch identifies and types data when it's loaded into your destination.
Note: This table doesn't display info for versions that have been sunset.
| Data type | Stored as |
| ADT | |
| BIGINT | INTEGER |
| FLOAT | FLOAT |
| FLOAT | FLOAT |
| BIT | |
| BLOB | |
| STRING | STRING |
| CLOB | |
| COLLECTION | |
| STRING | STRING , formatted as DATE-TIME |
| NUMBER | NUMBER |
| NUMBER | NUMBER |
| FLOAT | FLOAT |
| INTEGER | INTEGER |
| LONG | |
| LONG RAW | |
| LONGNVARCHAR | |
| LONGVARCHAR | |
| STRING | STRING |
| NCLOB | |
| NUMERIC | INTEGER OR DECIMAL |
| NVARCHAR | STRING |
| STRING | STRING |
| NUMBER | NUMBER |
| INTEGER | INTEGER |
| TIME | |
| TIMESTAMP | STRING , formatted as DATE-TIME |
| TINYINT | |
| STRING | STRING |
| STRING | STRING |
| Related | Troubleshooting |
Questions? Feedback?
Did this article help? If you have questions or feedback, feel free to submit a pull request with your suggestions, open an issue on GitHub, or reach out to us.