This integration is powered by Singer's SFTP tap and certified by Stitch. Check out and contribute to the repo on GitHub.
For support, contact Support.
SFTP feature snapshot
A high-level look at Stitch's SFTP (v1) integration, including release status, useful links, and the features supported in Stitch.
| STITCH | |||
| Release status |
Released on November 14, 2019 |
Supported by | |
| Stitch plan |
Standard |
Supported versions |
n/a |
| API availability |
Available |
Singer GitHub repository | |
| CONNECTION METHODS | |||
| SSH connections |
Supported |
SSL connections |
Unsupported |
| REPLICATION SETTINGS | |||
| Anchor Scheduling |
Supported |
Advanced Scheduling |
Supported |
| Table-level reset |
Unsupported |
Configurable Replication Methods |
Unsupported |
| REPLICATION METHODS | |||
| Log-based Replication |
Unsupported |
Key-based Replication |
Supported |
| Full Table Replication |
Unsupported |
||
| DATA SELECTION | |||
| Table selection |
Supported |
Column selection |
Supported |
| View replication |
Unsupported |
Select all |
Supported |
| TRANSPARENCY | |||
| Extraction Logs |
Supported |
Loading Reports |
Supported |
Connecting SFTP
SFTP setup requirements
To set up SFTP in Stitch, you need:
-
Files that adhere to Stitch’s file requirements:
First-row header (CSV files only) -
Every file must have a first-row header containing column names. Stitch assumes that the first row in any file is a header row, and will present these values as columns available for selection.
Note: If you are a Stitch Advanced or Premium customer, have a signed BAA with Stitch, and are replicating data subject to HIPAA, header rows must not contain any PHI.
-
Files with the same first-row header values, if including multiple files in a table. Stitch’s SFTP integration allows you to map several files to a single destination table. Header row values are used to determine a table’s schema. For the best results, each file should have the same header row values.
Note: This is not the same as configuring multiple tables. See the Search pattern section for examples.
File types - CSV (
.csv) - Text (
.txt)
Compression types These files must be correctly compressed or errors will surface during Extraction.
- gzip compressed files (
.gz) - zip compressed archive (
.zip)
Delimiters (CSV files only) - Comma (
,) - Tab (
/t) - Pipe (
|) - Semicolon (
;)
Character encoding The default encoding is UTF-8, but it can be changed to any encoding format supported by Python 3.9. For more information, see the Python documentation.
-
Step 1: Whitelist Stitch's IP addresses
For the connection to be successful, you’ll need to configure your firewall to allow access from our IP addresses.
The IP addresses you’ll whitelist depend on the Data pipeline region your account is in.
- Sign into your Stitch account, if you haven’t already.
- Click User menu (your icon) > Edit User Settings and locate the Data pipeline region section to verify your account’s region.
-
Locate the list of IP addresses for your region:
- Whitelist the appropriate IP addresses.
Step 2: Configure SSH for the SFTP server
To use SFTP, you’ll need to configure SSH via key-pair authentication. This allows Stitch to use an SSH tunnel to securely connect to your SFTP SFTP server.
If key-pair authentication isn’t configured, Stitch can still connect using username/password auth. Note: This step is required if key-pairs are required to log into the SFTP server. Alternatively, you can provide a password to use username/password authentication.
Step 2.1: Retrieve your Stitch public key
- On the Stitch Dashboard page, click the Add Integration button.
- Click the SFTP icon.
- The Stitch public key will be at the top of the page that opens.
Keep this page handy - you’ll need it in the next step.
Step 2.2: Add the public key to authorized_keys
Next, you’ll add the public key to the connecting SFTP user’s authorized_keys file on your server. This will allow Stitch to authenticate via a public key and connect to the server.
-
Open a new terminal window and log into your SSH server.
-
Create the
.sshdirectory , if it doesn’t already exist for the user you used to log in:mkdir ~/.ssh -
Using
chmod, alter the permissions of the directory to allow access:chmod 700 ~/.ssh -
Navigate to the
.sshdirectory:cd ~/.ssh -
Using
touch, create theauthorized_keysfile:touch authorized_keys -
Set the permissions for
authorized_keys:chmod 600 authorized_keys -
Import the Stitch public key into
authorized_keys, replacing<PUBLIC KEY>with the public key. Verify after replacing the key that it is on one line and doesn’t contain line breaks:echo "<PUBLIC KEY>" >> ~/.ssh/authorized_keys
Step 3: Add SFTP as a Stitch data source
- If you aren’t signed into your Stitch account, sign in now.
-
On the Stitch Dashboard page, click the Add Integration button.
- Locate and click the SFTP icon.
-
Fill in the fields as follows:
-
Integration Name: Enter a name for the integration. This is the name that will display on the Stitch Dashboard for the integration; it’ll also be used to create the schema in your destination.
For example, the name “Stitch SFTP” would create a schema called
stitch_sftpin the destination. Note: The schema name cannot be changed after the integration is saved. -
Host (Endpoint): Enter the host address (endpoint) used by the SFTP server. For example: This could be a network address such as
192.68.0.1, or a server endpoint likeserver.hosting-provider.com. -
Port: Enter the port used by the SFTP server. The default is
22. -
Username: Enter the username of the SFTP user. This should be the same user that added the public key to
authorized_keysin Step 2.2. -
Password: Note: If you configured SSH for the SFTP server, you don’t need to enter a password.
Otherwise, enter the password of the SFTP user.
-
Step 4: Select an encoding format
The default encoding format is utf-8, but you can update it by entering the name of the format in the Encoding Format field.
Note: The selected format will be used for all files selected. If a file is encoded in a different format, an error may occur. If you need to replicate data from files with different encoding formats, you should consider creating a different connection for each format.
Step 5: Configure tables
Next, you’ll indicate which file(s) you want to include for replication. You can include a single file, or map several files to a table. Refer to the Setup requirements section for info about what Stitch supports for SFTP files.
In the following sections, we’ll walk you through how to configure a table in Stitch:
Step 5.1: Define the table's search settings
In this step, you’ll tell Stitch which files on your SFTP server you want to replicate data from. To do this, you’ll use the Search Pattern and Directory fields.
Step 5.1.1: Define the Search Pattern
The Search Pattern field defines the search criteria Stitch should use for selecting and replicating files. This field accepts regular expressions, which can be used to include a single file or multiple files.
When creating a search pattern, keep the following in mind:
- If including multiple files for a single table, each file should have the same header row values.
- Special characters such as periods (
.) have special meaning in regular expressions. To match exactly, they’ll need to be escaped. For example:.\ - Stitch uses Python for regular expressions, which may vary in syntax from other varieties. Try using PyRegex to test your expressions before saving the integration in Stitch.
- Search patterns should account for how data in files is updated. Consider these examples:
| Scenario | Single file, periodically updated | Multiple files, generated daily |
| How updates are made | A single CSV file is periodically updated with new and updated customer data. | A new CSV file is created every day that contains new and updated customer data. Old files are never updated after they're created. |
| File name |
customers.csv
|
customers-[STRING].csv, where [STRING] is a unique, random string
|
| Search pattern |
Because there will only ever be one file, you could enter the exact name of the file in your S3 bucket: |
To ensure new and updated files are identified, you'd want to enter a search pattern that would match all files beginning with |
| Matches |
customer.csv, exactly
|
|
Step 5.1.2: Limit file search to a specific directory
The Directory field limits the location of the file search Stitch performs during replication jobs. When defined, Stitch will only search for files in this location and select those that match the search pattern. Note: This field is not a regular expression.
To define a specific location in the SFTP server, enter the directory path into the Directory field. For example: data-exports/lists/ will exactly match data-exports/lists/.
Step 5.2: Define the table's name
In the Table Name field, enter a name for the table. Keep in mind that each destination has its own rules for how tables can be named. For example: Amazon Redshift table names can’t exceed 127 characters.
If the table name exceeds the destination’s character limit, the destination will reject the table entirely. Refer to the documentation for your destination for more info about table naming rules.
Step 5.3: Define the table's Primary Key
In the Primary Key field, enter one or more header fields (separated by commas) Stitch can use to identify unique rows. For example:
account_id,date
Step 5.4: Specify datetime fields
In the Specify datetime fields field, enter one or more header fields (separated by commas) that should appear in the destination table as datetime fields instead of strings. For example:
created_at,updated_at
Step 5.5: Configure additional tables
If you want to add another table, click the Configure another table? link below the Specify datetime fields field. Otherwise, move onto the Sync historical data section.
Stitch doesn’t enforce a limit on the number of tables that you can configure for a single integration.
Step 6: Define the historical sync
For example: You’ve added a customers.*\csv search pattern and set the integration’s historical Start Date to 1 year.
-
During the initial replication job, Stitch will fully replicate the contents of all files that match the search pattern that have been modified in the past year.
-
During subsequent replication jobs, Stitch will only replicate the files that have been modified since the last job ran.
As files included in a replication job are replicated in full during each job, how data is added to updated files can impact your row count. Refer to the Data replication section for more info on initial and subsequent replication jobs.
Step 7: Create a replication schedule
In the Replication Frequency section, you’ll create the integration’s replication schedule. An integration’s replication schedule determines how often Stitch runs a replication job, and the time that job begins.
SFTP integrations support the following replication scheduling methods:
-
Advanced Scheduling using Cron (Advanced or Premium plans only)
To keep your row usage low, consider setting the integration to replicate less frequently. See the Understanding and Reducing Your Row Usage guide for tips on reducing your usage.
Step 8: Select data to replicate
The last step is to select the tables and columns you want to replicate.
Note: If a replication job is currently in progress, new selections won’t be used until the next job starts.
For SFTP integrations, you can select:
-
Individual tables and columns
-
All tables and columns
Click the tabs to view instructions for each selection method.
- In the Integration Details page, click the Tables to Replicate tab.
- Locate a table you want to replicate.
- Click the checkbox next to the table’s name. A blue checkmark means the table is set to replicate.
- After you set a table to replicate, a page with the table’s columns will display. De-select columns if needed. Note: SFTP tables replicate using Key-based Incremental Replication. Refer to the Replication section for more info.
-
Repeat this process for every table you want to replicate.
- Click the Finalize Your Selections button at the bottom of the page to save your data selections.
- Click into the integration from the Stitch Dashboard page.
-
Click the Tables to Replicate tab.
-
Navigate to the table level, selecting any databases and/or schemas that contain tables you want to replicate.
- In the list of tables, click the box next to the Table Names column.
-
In the menu that displays, click Track AllTables and Fields (Except Views):
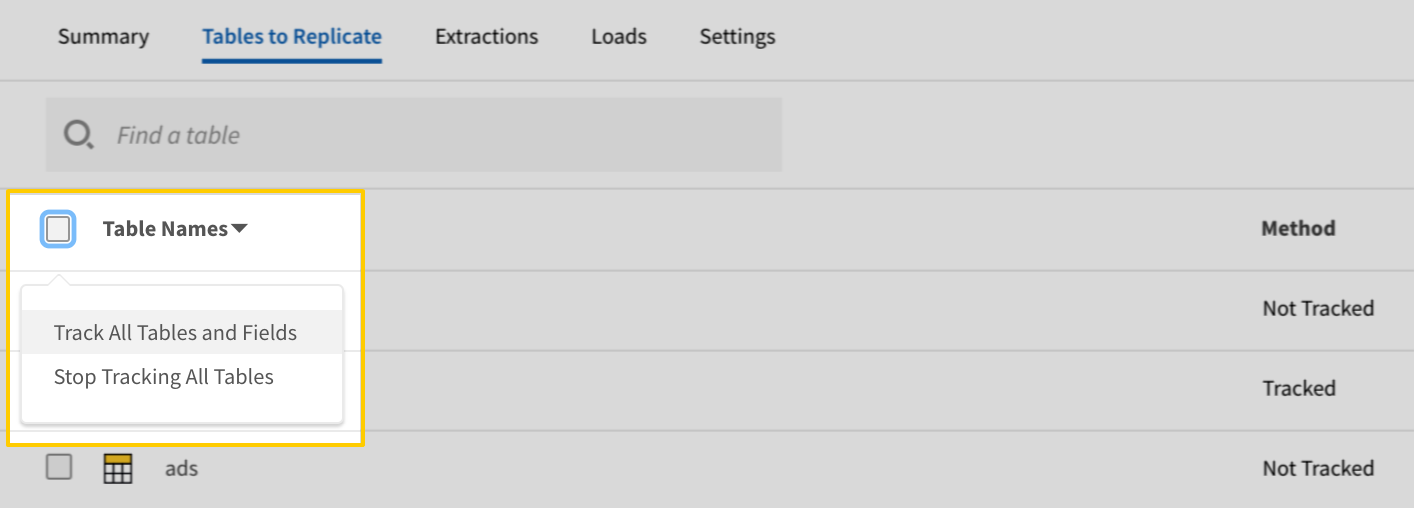
- Click the Finalize Your Selections button at the bottom of the page to save your data selections.
Initial and historical replication jobs
After you finish setting up SFTP, its Sync Status may show as Pending on either the Stitch Dashboard or in the Integration Details page.
For a new integration, a Pending status indicates that Stitch is in the process of scheduling the initial replication job for the integration. This may take some time to complete.
Initial replication jobs with Anchor Scheduling
If using Anchor Scheduling, an initial replication job may not kick off immediately. This depends on the selected Replication Frequency and Anchor Time. Refer to the Anchor Scheduling documentation for more information.
Free historical data loads
The first seven days of replication, beginning when data is first replicated, are free. Rows replicated from the new integration during this time won’t count towards your quota. Stitch offers this as a way of testing new integrations, measuring usage, and ensuring historical data volumes don’t quickly consume your quota.
SFTP replication
In this section:
-
Details about object and data type discovery and selecting data for replication
-
Details about how data replicated from SFTP is loaded into a destination
Extraction
For every table set to replicate, Stitch will perform the following during Extraction:
Discovery
During Discovery, Stitch will:
Determining table schemas
At the start of each replication job, Stitch will analyze the header rows in the five most recently modified files returned by the table’s search pattern. The header rows in these files are used to determine the table’s schema.
For this reason, the structure of files replicated using SFTP should be the same for every file included in a table’s configuration. If the header row in an included file changes after the fifth most recently modified file, Stitch will not detect the difference.
For example: Based on the files in the table below, the table created from these files would have id, name, and active columns. The has_magic column in the customers-001.csv file will not be detected, as it’s not in the five most recently modified files.
| Updated | Included in discovery | File name | Header row |
| 1 (most recent) | true | customers-006.csv | id,name,active |
| 2 | true | customers-005.csv | id,name,active |
| 3 | true | customers-004.csv | id,name,active |
| 4 | true | customers-003.csv | id,name,active |
| 5 | true | customers-002.csv | id,name,active |
| 6 | false | customers-001.csv | id,name,has_magic,active |
Data typing
To determine data types, Stitch will analyze the first 1,000 rows in the files included in object discovery.
If a column has been specified as a datetime column, Stitch will attempt to parse the value as a date. If this fails, the column will be loaded as a nullable STRING.
For all other columns, Stitch will perform the following to determine the column’s data type:
- Attempt to parse the value as an
INTEGER - If that fails, attempt to parse the value as a
FLOAT - If that fails, type the column as a
STRING. Note: If a column contains entirely null values, it will be created as an empty column in the destination with a type ofSTRING.
Data replication
After discovery is completed, Stitch will move onto extracting data.
While data from SFTP integrations is replicated using Key-based Incremental Replication, the behavior for this integration differs subtly from other integrations.
The table below compares Key-based Incremental Replication and Replication Key behavior for SFTP to that of other integrations.
| SFTP | Other integrations | |
| What's replicated during a replication job? |
The entire contents of a modified file. |
Only new or updated rows in a table. |
| What's used as a Replication Key? |
The time a file is modified. |
A column or columns in a table. |
| Are Replication Keys inclusive? |
No. Only files with a modification timestamp value greater than the last saved bookmark are replicated. |
Yes. Rows with a Replication Key value greater than or equal to the last saved bookmark are replicated. |
To reduce row usage, only include updated records in new files that match a table’s search pattern. This will ensure that only updated records are replicated and counted towards your usage.
Loading
How data replicated from an SFTP integration is loaded into your destination depends on two factors:
-
If Primary Keys were specified for the table during integration setup. If Primary Keys aren’t specified during setup, Stitch will load data in an Append-Only manner. This means that new records and updates to existing records are appended to the end of the table as new rows.
-
If your destination supports upserts, or updating existing rows. For destinations that support upserts, Stitch uses Primary Keys to de-dupe data during loading. Primary Keys are used to identify unique rows within a table and ensure that only the most recently updated version of that record appears in your destination.
Note: For Append-Only destinations, data will be loaded in an Append-Only manner regardless of whether a Primary Key is specified during setup.
Loading with defined Primary Keys
If the destination supports upserts and Primary Keys are defined during setup, Stitch will use the Primary Keys to de-dupe records during loading.
This means that existing rows will be overwritten with the most recent version of the row. A record can only have a single unique Primary Key value, ensuring that only one version of the record exists in the destination at a time.
For example: The following rows are replicated during the initial replication job:
| id | name | type |
| 1 | Finn | human |
| 2 | Jake | dog |
Before the next job, the file containing these rows is modified. This means that Stitch will replicate the contents of the entire file, including the rows for Finn and Jake even if they haven’t been updated.
Stitch will use the Primary Key to de-dupe the records, making the table in the destination look similar to the following:
| id | name | type |
| 1 | Finn | human |
| 2 | Jake | dog |
| 3 | Beamo | robot |
| 4 | Bubblegum | princess |
Loading without defined Primary Keys
If the destination is Append-Only, or if Primary Keys aren’t defined during setup, data will be loaded in an Append-Only manner.
Additionally, Stitch will append a column (__sdc_primary_key) to the table to function as a Primary Key if one isn’t defined.
Note: Appending this column will not enable Stitch to de-dupe data, as a unique value is inserted every time a row is loaded, regardless of whether it’s ever been replicated before. This means that a record can have multiple __sdc_primary_key values, each of them unique.
For example: The following rows are replicated during the initial replication job:
| __sdc_primary_key | id | name | type |
| b6c0fd8c-7dec-4e34-be93-2b774fde32cc | 1 | Finn | human |
| 4b5c413c-1adf-4720-8ccc-48579d6b4e58 | 2 | Jake | dog |
Before the next job, the file containing these rows is modified. This means that Stitch will replicate the contents of the entire file, including the rows for Finn and Jake even if they haven’t been updated.
In the destination, the table might now look like the table below. Notice that records for Finn and Jake have been appended to the end of the table with new __sdc_primary_key values:
| __sdc_primary_key | id | name | type |
| b6c0fd8c-7dec-4e34-be93-2b774fde32cc | 1 | Finn | human |
| 4b5c413c-1adf-4720-8ccc-48579d6b4e58 | 2 | Jake | dog |
| 0acd439b-cefe-436c-b8ba-285bd956057b | 1 | Finn | human |
| 7e9fa5cf-1739-45a2-9a89-caa6f393efc9 | 2 | Jake | dog |
| 634d6945-1762-4049-b997-cd9240d4592b | 3 | Beamo | robot |
| c5fb32b8-a16d-455d-96c9-b62fff22fe4b | 4 | Bubblegum | princess |
Note: Querying Append-Only tables requires a different strategy than you might normally use. For instructions and a sample query, check out the Querying Append-Only tables guide.
| Related | Troubleshooting |
Questions? Feedback?
Did this article help? If you have questions or feedback, feel free to submit a pull request with your suggestions, open an issue on GitHub, or reach out to us.