Welcome to Stitch!
This guide will help you get your Stitch data pipeline up and running. In this guide, we’ll cover:
If you have any questions not covered in this guide, check out the rest of our documentation or reach out to our support team.
Let’s get started.
Prerequisites
A Stitch account. Don’t have an account yet? Sign up for your free trial here before proceeding.
A destination. Typically a database or data warehouse, this is where Stitch will load data replicated from your data sources.
An integration, like a database or SaaS application.
Step 1: Choose and connect a destination
Step 1.1: Choose a destination
If you already have a destination in mind, skip to the next step.
The first step is to choose the destination you want to use with Stitch. As your destination determines how data is loaded and structured, we recommend familiarizing yourself with our destinations before replicating any data.
Users on a Stitch or plan may add multiple destinations. Users on a Stitch Standard plan may only add one.
Additionally, you can change the type of destination you’re using at any time on any plan.
If you’re new to data warehousing or you want to see how Stitch’s destination offerings compare to each other, check out our Choosing a Destination guide. This guide will help you choose the best Stitch destination for your data warehousing needs, from ensuring your data sources are compatible to staying within your budget.
Step 1.2: Connect the destination
After you’ve chosen the destination you want to use, you can connect it to Stitch. The setup for some destinations requires technical expertise, such as familiarity with running SQL commands or using the command line. If you’re unsure about how to proceed, we recommend looping in a member of your technical team before proceeding.
For setup requirements and instructions, refer to our destination setup guides:
Step 2: Connect an integration
After you’ve set up a destination, you can start connecting your integrations.
An integration is what we call a data source. Using Stitch’s native integrations, you can replicate data from databases, SaaS applications, and webhooks into your destination.
Don’t see a data source you want? Don’t worry - there are options! Check out the Connecting other data sources guide for more info.
Step 2.1: Verify integration setup requirements
Before setting up a new integration, we recommend first checking the integration’s documentation. This way, you can be sure you have everything you need to successfully complete the setup.
Some integrations have requirements that must be met before you can connect it to Stitch. If you attempt to connect the integration without first completing the requirements, you’ll run into issues either with the connection or replication.
For example: The following table lists some of our most popular integrations and their setup requirements:
| Integration | Setup requirements |
| Most databases |
|
| Google Analytics |
|
| Salesforce |
|
| NetSuite |
|
For the setup requirements and instructions for all of Stitch’s integrations, refer to our library of integration documentation.
Step 2.2: Connect the integration
After you’ve verified that you meet the integration’s setup requirements, you can connect it to Stitch.
Note: The setup for some integrations - usually databases - requires technical expertise, such as familiarity with running SQL commands or using the command line. If you’re unsure about how to proceed, we recommend looping in a member of your technical team before proceeding.
Use the setup guide for your integration to complete the setup.
Step 3: Define replication settings
The next steps will vary depending on the type of integration you connect. If you set up an Import API or webhook integration, you’re all done! These are considered “push” integrations, meaning that data is automatically pushed to Stitch from the data source.
For all other integrations, data is “pulled” from the source. An integration’s replication settings define how, when, and what data is pulled from a source.
Step 3.1: Understand the replication process
Before we walk you through how to define replication, you should familiarize yourself with Stitch’s replication process. This will ensure settings are defined appropriately and replication is efficient.
Check out the Replication section in the Basic concepts and system overview guide for a quick overview.
Step 3.2: Create the replication schedule
When you initially set up an integration, you’ll be asked to create a replication schedule. Replication schedules affect the time that replication jobs begin and how often they occur. Specifically, replication scheduling controls the frequency and start time of the Extraction phase of the replication process, which is when Stitch extracts data from the data source.
Refer to the Replication Scheduling guide for more info about replication scheduling and the scheduling methods Stitch currently offers.
After you’ve selected the replication scheduling method you want to use, use the appropriate settings in the Integration Settings page to create the schedule.
Step 3.3: Set data to replicate
Next, you’ll tell Stitch what data you want to replicate from the integration. This is called table and column selection.
The majority of Stitch’s integrations offer some level of data selection, but there are some that don’t. The level of data selection support determines not only the data you can choose to replicate, but how Stitch behaves when data selection isn’t fully supported.
The following table outlines how Stitch will behave for each level of data selection support:
| Table selection | Column selection | Result |
| Only selected tables and columns are replicated | ||
| All available columns in selected tables are automatically selected for replication | ||
| All available tables and columns are automatically selected for replication |
For SaaS integrations, you can see what data is available through Stitch in each integration’s Schema documentation.
If selecting tables and columns is required to finish setting up an integration, Stitch will direct you to do so after the connection has been saved. Additionally, the integration’s status will be Not Configured in the dashboard until this has been completed:

Step 3.4: Define table Replication Methods
All tables you set to replicate must have a Replication Method associated with them. A table’s Replication Method tells Stitch how data from the table should be extracted.
Step 3.4.1: Understand Stitch's Replication Methods
The Replication Method setting is the single most important replication setting in Stitch for your data. It determines not only how records from a table are replicated, but what records are replicated.
Incorrectly defining this setting can lead to data discrepancies, latency, and increased row usage. For this reason, we recommend reading the Replication Method guide before defining methods for your tables.
Step 3.4.2: Choose a Replication Method
Now that you understand how Replication Methods work, you can choose one for your table. Replication Methods are defined on a table-by-table basis.
Stitch offers the following Replication Methods:
-
Full Table: Full Table Replication is a replication method in which all rows in a table - including new, updated, and existing - are replicated during every replication job.
-
Key-based Incremental: Key-based Incremental Replication is a replication method in which Stitch identifies new and updated data using a column called a Replication Key.
-
Log-based Incremental: Log-based Incremental Replication is a replication method in which Stitch identifies modifications to records - including inserts, updates, and deletes - using a database’s binary log files.
Keep in mind that the Replication Method that works for one table may not be suitable for another. If you’re not sure which method to choose, refer to the comparison table in the Replication Method guide.
Step 3.4.3: Set the table's Replication Method
After you set a table to replicate, the Table Settings page will display. On this page, select the Replication Method you want to use, a Replication Key (if applicable), and click Update Settings.
Step 4: Monitor replication jobs
After you fully configure an integration, the integration might have a Pending status in the Last Sync Completed field on the Stitch Dashboard page:

A Pending status indicates that Stitch is in the process of scheduling a replication job for the integration. When the status changes to In Progress, it means that the replication job has started. To kick off a job sooner, you can use the Force Extraction feature in the integration’s Extractions tab.
In this case, the job will replicate all historical data for the integration. Historical jobs tend to be larger in volume compared to subsequent jobs, and as a result may take longer to process and load into your destination. It’s normal to see a large spike in replicated rows during this time, but you can expect your row usage to decrease and eventually level out.
To keep an eye on where Stitch is in the replication process, you can use the integration’s replication stats, Extraction Logs, and Loading Reports.
Integration replication stats
Click on the integration from the Stitch Dashboard to open the Integration Details page:
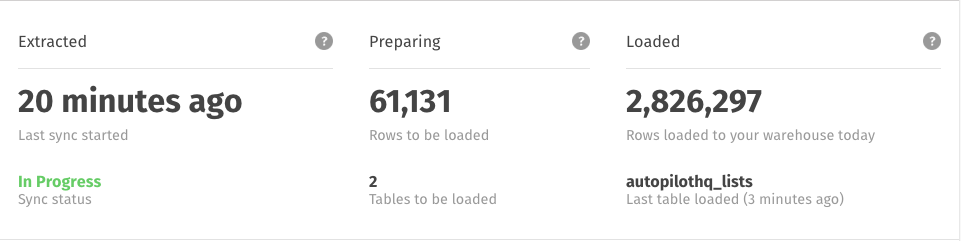
Integration replication stats. These stats are not real-time and will update every few minutes. You'll need to refresh the page if you're eager to watch your data move through Stitch.
To learn more about how info is displayed in these fields, check out the Monitoring Replication Progress guide.
Extraction Logs
Extraction Logs detail the Extract phase of Stitch’s replication process. In the logs, you can see how data is queried and extracted, along with any errors that may occur.
Click the Extractions tab in the integration to open its Extraction Logs.
Loading Reports
Loading Reports detail the Loading phase of Stitch’s replication process. In the reports, you can see the status of loads for individual tables, the number of rows loaded for the table, and any errors that occurred during the load.
Click the Loads tab in the integration to open its Loading Reports.
Step 5: Check out your data
Now that Stitch has loaded your data, it’s time to check it out!
To analyze or interact with the data Stitch replicates, you’ll need an additional tool. Check out our list of analysis tools to find the visualization, analysis, or data science tool that’s right for you.
Next steps
Congratulations! You set up a destination, connected an integration, and configured replication settings. You’re on your way to moving your data.
So, what’s next? Here’s what we recommend:
- Get a handle on the basic concepts of Stitch, if you haven’t already. This guide will provide you with the foundational knowledge you need to have the best experience with Stitch and set you up for success.
- Get to know your destination. Every destination handles data differently, which will impact how Stitch loads and stores the data it replicates from your integrations. Check out the Destination Data Loading guide for the specifics on your destination.
- Get to know your SaaS integrations, if you plan on connecting any. Just like destinations, every SaaS integration structures its data differently. How Stitch replicates and loads SaaS data depends in part on how that data is created and structured. Our extensive SaaS integration docs cover what Stitch will replicate and how.
- Invite your team. Loop in your colleagues to set up integrations and get the data flowing.
If you have any questions not covered in this guide, check out the rest of our documentation or reach out to our support team.
Questions? Feedback?
Did this article help? If you have questions or feedback, feel free to submit a pull request with your suggestions, open an issue on GitHub, or reach out to us.