Feature availibility
The Historical Sync/Start Date feature may not be available for some integrations. Because this approach uses date-based replication, some integrations may be incompatible.
When you connect a SaaS integration, Stitch will begin the process of replicating not only that integration’s recent data, but the historical data as well. During the setup of the integration, you can choose the start date by using Stitch’s default starting date or defining your own custom date.
Historical data loads and Replication Keys
The default starting date (or a custom date, if you define one) essentially sets the Replication Keys for the Incremental tables in the integration. This tells Stitch how far back in time to query for historical data.
Note: Any tables using Full Table Replication will still replicate in full during every replication job, even during the initial job.
Unless you define a different starting date for an integration, Stitch will use the integration’s default starting date:
The majority of integrations have a default starting date of -1 year from the date the integration is created. For example: If you use the integration’s default date of -1 year and the date you create the integration is January 22, 2019, Stitch queue a historical replication job for data created/updated between January 22, 2018 - January 22, 2019.
Default starting dates
In the table below (click the link to open it), you’ll find a rollup of all the default start dates for SaaS integrations.
To see a list of that integration’s tables and the Replication Methods they use, click the integration name.
Uses and considerations
An integration’s start date can be defined when you initially connect the integration to Stitch or after the fact. If the date is changed after the initial setup, the integration’s Replication Keys will be reset AND a full re-replication of all the integration’s data will be queued.
Uses
Aside from ensuring Stitch replicates all the historical data you need, changing an integration’s start date can serve several other purposes:
- Account for hard-deletes. While we strongly recommend you use soft-deletes whenever possible, the full re-replication triggered by changing an integration’s start date will overwrite the data in your data warehouse. This will remove any hard-deleted records that may exist in your data warehouse but not in the source.
- Reset Replication Keys.
-
Resolve data discrepancies. If you believe you’re missing data, try to narrow it down to a specific timeframe. If that timeframe falls outside the default starting date, this may be the root cause of the discrepancy. Changing the start date for the integration will bring in the data outside the original range.
If this doesn’t apply, check out the Data Discrepancy Troubleshooting Guide for more data discrepancy troubleshooting tips.
Considerations
Note that these points shouldn’t cause worry or discourage you from setting up historical replication job or queueing re-replications - they’re only intended to give you a comprehensive look at the process so you can make an informed decision.
If you have any questions or concerns, reach out to support before changing the start date.
- This process cannot be undone. Once a historical replication job is queued, there’s no way to stop it.
- Depending on the integration, there may be limitations. Webhook-based integrations like SendGrid, for example, don’t retain historical data. Check out the rollup in the Default Starting Dates section for specifics.
- Row usage will spike. It should be noted that some integrations - like Mixpanel - can contain large (sometimes astronomical) amounts of data. The full re-replication triggered by changing the start date will count against your row count.
- Recent data may be re-replicated. For example: you set up an integration and the original replication job contained data only for 2016. You are now setting up a historical job for this integration with a start date of 1/1/2015. This will replicate data for all of 2015 and 2016.
-
You may experience stale data/reports. When a historical replication job runs, no recent data will be retrieved until the replication and loading of the historical data is complete. The volume of data to be replicated and the design of the provider’s API can both affect how long a historical data load will take.
For example: NetSuite’s API tends to be on the slower side, so it may take some time to complete a full re-replication due to the API design and the sheer amount of data that’s available.
-
The time a historical replication job takes may be affected by an integration’s API quota. Some integrations - like Salesforce and Marketo - use API quotas, which limit your API usage. While our integrations are designed not to consume all of your available quota, if you’re using the integration’s API somewhere else, this process may use up your quota.
As Stitch will be unable to continue replicating data once the quota has been consumed, this can extend the length of time the historical replication job will take, thus affecting the freshness of your reports.
Changing an integration’s start date
During the initial setup
To use a custom start date during the initial setup:
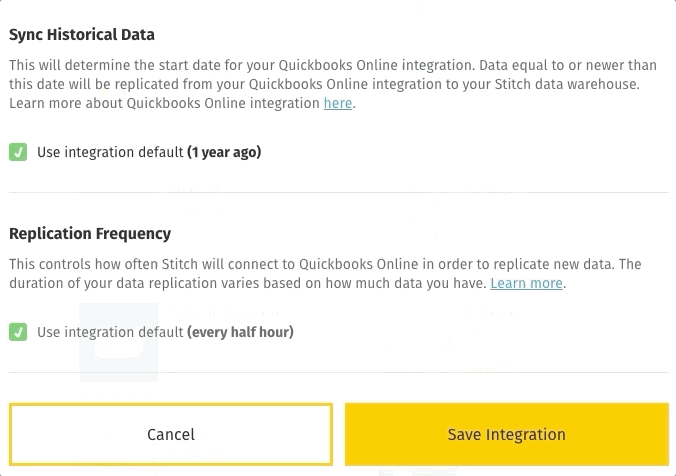
- After defining the rest of the integration’s settings, locate the Sync Historical Data section.
- Uncheck the Use Integration Default box.
- Define the new starting date using the drop-down.
- When finished, click the Save Integration button.
Note: It may take some time for Stitch to perform a structure sync for the integration and begin replicating data. After the structure sync is complete, Stitch will begin replicating data according to the integration’s Replication Schedule.
After the initial setup
- From the Stitch Dashboard page, click into the integration.
- In the Integration Details page, click the Settings tab, next to Tables to Replicate.
- Scroll down to the Sync Historical Data section.
- In the Start Date section, click the Change Date link.
- Define the new starting date using the drop-down.
- Click the Update Settings button.
- When prompted, click OK to confirm the change.
If successful, a confirmation message will display indicating the replication job has been queued. After a structure sync is performed, Stitch will begin replicating data according to the integration’s Replication Schedule.
Questions? Feedback?
Did this article help? If you have questions or feedback, feel free to submit a pull request with your suggestions, open an issue on GitHub, or reach out to us.