This integration is powered by Singer's Quick Base tap. For support, visit the GitHub repo or join the Singer Slack.
Quick Base integration summary
Stitch’s Quick Base integration replicates data using the Quick Base HTTP API. Refer to the Schema section for a list of objects available for replication.
Quick Base feature snapshot
A high-level look at Stitch's Quick Base (v1) integration, including release status, useful links, and the features supported in Stitch.
| STITCH | |||
| Release status |
Released on June 27, 2018 |
Supported by | |
| Stitch plan |
Standard |
API availability |
Available |
| Singer GitHub repository | |||
| REPLICATION SETTINGS | |||
| Anchor Scheduling |
Supported |
Advanced Scheduling |
Supported |
| Table-level reset |
Unsupported |
Configurable Replication Methods |
Unsupported |
| DATA SELECTION | |||
| Table selection |
Supported |
Column selection |
Supported |
| Select all |
Supported |
||
| TRANSPARENCY | |||
| Extraction Logs |
Supported |
Loading Reports |
Supported |
Connecting Quick Base
Step 1: Retrieve your Quick Base URL and app ID
Step 1.1: Retrieve your Quick Base URL
To retrieve your URL, sign into your Quick Base account.
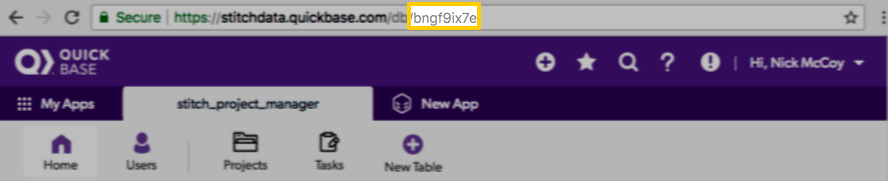
You’ll need to enter the URL that displays in your browser into Stitch. You should include the https:// portion, and omit anything after db/.
For example: Based on the URL in the image below, we’d enter https://stitchdata.quickbase.com/db/ into Stitch:

Step 1.2: Retrieve your Quick Base app ID
Next, you’ll retrieve the ID of the Quick Base app you want to replicate data from.
In Quick Base, click the desired app in the My Apps section.
When the app opens, the URL in your browser will now contain the app’s ID. This is the alpha-numeric string after db/. In this example, the app ID is bngf9ix7e.
Step 2: Create a Quick Base user token
QuickBase user tokens
Quick Base user tokens are linked to the user who creates them. This means that Stitch will only be able to access the same data in Quick Base as the user who creates the token.
Before proceeding, verify that you can access the tables and fields in Quick Base that you want to replicate.
- In Quick Base, click the user menu (your name) in the top right corner.
- Click My preferences.
- In the My User Information section, click Manage my user tokens for [company name] realm…, located next to Manage User Tokens.
- On the My User Tokens page, click + New user token.
- Fill in the following:
- Name: Enter a name for the token. For example:
Stitch - Description: If desired, enter a description.
- Assign token to apps: From the dropdown, select the app you want to replicate data from.
- Name: Enter a name for the token. For example:
- Click Save.
The token will display in the Token field of the My User Tokens page. Keep this page open for now - you’ll need it to complete the next step.
Step 3: Add Quick Base as a Stitch data source
- Sign into your Stitch account.
-
On the Stitch Dashboard page, click the Add Integration button.
-
Click the Quick Base icon.
-
Enter a name for the integration. This is the name that will display on the Stitch Dashboard for the integration; it’ll also be used to create the schema in your destination.
For example, the name “Stitch Quick Base” would create a schema called
stitch_quick_basein the destination. Note: Schema names cannot be changed after you save the integration. - In the Quick Base API URL field, enter the Quick Base URL you retrieved in Step 1. For example:
https://stitchdata.quickbase.com/db/ - In the Quick Base APP ID field, enter the Quick Base app ID you retrieved in Step 1. For example:
bngf9ix7e - In the Quick Base User Token field, paste the user token you created in Step 2.
Step 4: Define the historical replication start date
The Sync Historical Data setting defines the starting date for your Quick Base integration. This means that data equal to or newer than this date will be replicated to your data warehouse.
Change this setting if you want to replicate data beyond Quick Base’s default setting of 1 year. For a detailed look at historical replication jobs, check out the Syncing Historical SaaS Data guide.
Step 5: Create a replication schedule
In the Replication Frequency section, you’ll create the integration’s replication schedule. An integration’s replication schedule determines how often Stitch runs a replication job, and the time that job begins.
Quick Base integrations support the following replication scheduling methods:
-
Advanced Scheduling using Cron (Advanced or Premium plans only)
To keep your row usage low, consider setting the integration to replicate less frequently. See the Understanding and Reducing Your Row Usage guide for tips on reducing your usage.
Initial and historical replication jobs
After you finish setting up Quick Base, its Sync Status may show as Pending on either the Stitch Dashboard or in the Integration Details page.
For a new integration, a Pending status indicates that Stitch is in the process of scheduling the initial replication job for the integration. This may take some time to complete.
Initial replication jobs with Anchor Scheduling
If using Anchor Scheduling, an initial replication job may not kick off immediately. This depends on the selected Replication Frequency and Anchor Time. Refer to the Anchor Scheduling documentation for more information.
Free historical data loads
The first seven days of replication, beginning when data is first replicated, are free. Rows replicated from the new integration during this time won’t count towards your quota. Stitch offers this as a way of testing new integrations, measuring usage, and ensuring historical data volumes don’t quickly consume your quota.
Quick Base table reference
Schemas and versioning
Schemas and naming conventions can change from version to version, so we recommend verifying your integration’s version before continuing.
The schema and info displayed below is for version 1 of this integration.
This is the latest version of the Quick Base integration.
Every table in a Quick Base app will display as a selectable table in the Stitch app. Tables are named according to this convention: [app_name]__[table_name].
For example: If an app named event_handling contained customers, events, and rsvps tables, you could expect the following tables to be created in your destination:
event_handling__customersevent_handling__eventsevent_handling__rsvps
Table attributes
The schema of Quick Base tables will contain the fields the user linked with the user token has access to, along with a handful of other fields:
|
rid STRING |
The unique record ID. This is the Primary Key for the table. |
|
record_id STRING |
The unique record ID. |
|
date_created DATE-TIME |
The date the record was created. |
|
date_modified DATE-TIME |
The date the record was last modified. This is the column Stitch will use as a Replication Key. |
|
last_modified_by STRING |
The ID of the user who last modified the record. |
|
record_owner STRING |
The ID of the user who created the record. |
Table attribute names
Some destinations restrict the use of special characters and spaces in column names. While Quick Base doesn’t restrict the use of these characters in their app, attempting to load column names as-is from Quick Base may cause issues.
To prevent loading issues, Stitch’s Quick Base will perform the following on column names:
- Replace spaces and hyphens (
-) with underscores (_) - Remove all other nonalphanumeric characters, such as
!or# - Lowercase capitalized characters
Below are a handful of examples of how Quick Base column names will appear in Stitch:
| Column name in Quick Base | Column name in Stitch |
| Customer Name | customer_name |
| Is a VIP? | is_a_vip |
| EmAiLAdDrEsS | emailaddress |
| Street!Address | streetaddress |
| Phone #number | phone_number |
| Related | Troubleshooting |
Questions? Feedback?
Did this article help? If you have questions or feedback, feel free to submit a pull request with your suggestions, open an issue on GitHub, or reach out to us.