In this tutorial, we’ll walk you through how to connect a Google CloudSQL PostgreSQL instance to Stitch as a destination.
For more info on Google CloudSQL’s features and limitations, check out the official Google documentation.
Prerequisites
-
An up-and-running, publicly accessible Google CloudSQL PostgreSQL instance. Instructions for creating a Google CloudSQL PostgreSQL destination are outside the scope of this tutorial; our instructions assume that you have an instance up and running. For help getting started with Google CloudSQL PostgreSQL, refer to Google’s documentation.
Note: The instance you want to connect must be both publicly accessible and running PostgreSQL version 9.3 or higher.
An existing, billing-enabled Cloud Platform project that houses the instance. Even if you’re using the Free option, billing must be enabled for the project or Stitch will encounter connection issues.
Selecting a project can be done in the Projects page of the Google Console.
Access to the CloudSQL Administration API for the Cloud Platform Project housing the instance. Refer to Google’s documentation for more info.
Database privileges that allow you to create users and grant privileges. This is required to create a database user for Stitch.
Step 1: Verify your Stitch account's data pipeline region
First, you’ll log into Stitch and verify the data pipeline region your account is using. Later in this guide, you’ll need to grant Stitch access by whitelisting our IP addresses.
The IP addresses you’ll whitelist depend on the Data pipeline region your account is in.
- Sign into your Stitch account, if you haven’t already.
- Click User menu (your icon) > Edit User Settings and locate the Data pipeline region section to verify your account’s region.
-
Locate the list of IP addresses for your region:
Keep this list handy - you’ll need it later.
Step 2: Configure database connection settings
For Stitch to successfully connect with your CloudSQL instance, you’ll need to add our IP addresses to the database’s authorized networks list.
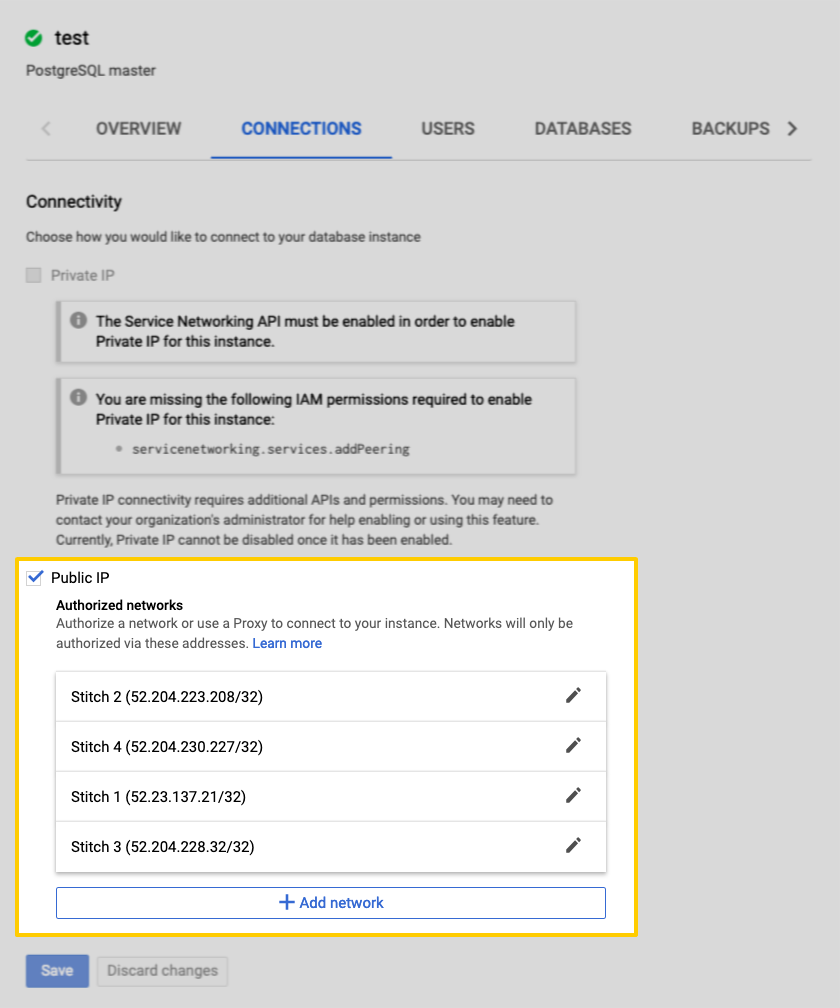
- Sign into your Google Cloud Platform account.
- Navigate to the Cloud SQL Instances page.
- Click the instance name to open its details page.
- Click the Connections tab.
- Locate the Public IP section.
-
For each of the Stitch data pipeline region IP addresses you retrieved in Step 1, complete the following:
- Click + Add network.
- In the Name field, enter a name for the IP address. For example:
Stitch 1for the first IP address,Stitch 2for the second, and so on. - In the Network field, paste one of the IP addresses for your Stitch data pipeline region that you retrieved in Step 1.
- Click Done.
- Repeat these steps until all of Stitch’s IP addresses for your data pipeline region have been added.
- When finished, click Save to update the instance.
Step 3: Create a Google CloudSQL PostgreSQL Stitch user
Configuring the second part of the access control settings requires creating a database user for Stitch. This guide will use the psql method to create the user, which requires the use of a SQL client.
-
If you haven’t already, connect to your Google CloudSQL PostgreSQL instance using your SQL client.
-
After connecting, run this command to create a user named
stitch. Replace<password>with a secure password:CREATE USER stitch WITH PASSWORD '<password>'; -
Next, you’ll assign the
CREATEpermissions to the Stitch user. For<database_name>, enter the name of the database where all Stitch-replicated data should be loaded.Note: This must be a pre-existing database.
GRANT CREATE ON DATABASE <database_name> TO stitch -
If you restricted access to the system tables, you’ll also need to run the following commands to grant the Stitch user
SELECTpermissions.GRANT SELECT ON ALL TABLES IN SCHEMA information_schema TO stitch GRANT SELECT ON ALL TABLES IN SCHEMA pg_catalog TO stitch
In the table below are the database user privileges Stitch requires to connect to and load data into Google CloudSQL PostgreSQL.
| Privilege name | Reason for requirement |
| CREATE ON DATABASE |
Required to create the necessary database objects to load and store your data.
Note: The |
| SELECT ON ALL TABLES IN information_schema |
Required to select rows from tables in the Note: Stitch will only ever read data from systems tables. |
| SELECT ON ALL TABLES IN pg_catalog |
Required to select rows from tables in the Note: Stitch will only ever read data from systems tables. |
Step 4: Connect Stitch
To complete the setup, you need to enter your Google CloudSQL PostgreSQL connection details into the Destination Settings page in Stitch.
Step 4.1: Locate the connection details in the Google Console
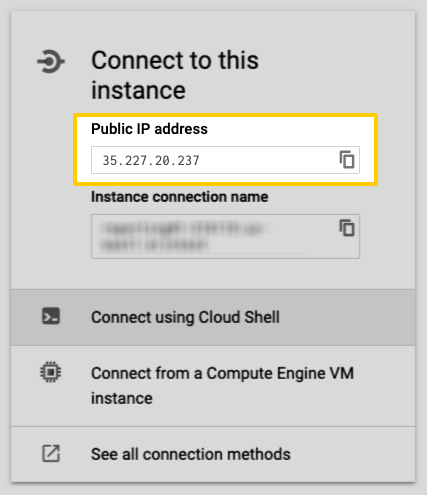
In this step, you’ll locate the Google CloudSQL PostgreSQL database’s public IP address in the Google Cloud Platform console. This will be used to complete the setup in Stitch.
- In the CloudSQL Instances page, locate the instance you want to connect to Stitch.
- When the instance’s Overview page displays, scroll down to the Connect to this instance section.
- Locate the Public IP address field.
- Copy and paste the public IP address into a text file or leave this page open and open your Stitch account in another tab.
Step 4.2: Enter connection details into Stitch
- If you aren’t signed into your Stitch account, sign in now.
-
Click the Destination tab.
- Locate and click the PostgreSQL icon.
-
Fill in the fields as follows:
-
Host (Endpoint): Enter the host address (endpoint) of your Google CloudSQL PostgreSQL instance. This will be the value of the Public IP address that you retrieved in the previous step.
-
Port: Enter the port used by the Google CloudSQL PostgreSQL instance. The default is
5432. -
Username: Enter the Stitch Google CloudSQL PostgreSQL database user’s username.
-
Password: Enter the password for the Stitch Google CloudSQL PostgreSQL database user.
-
**: Enter the name of the Google CloudSQL PostgreSQL database you want to connect to Stitch.
-
Step 4.3: Save the destination
When finished, click Check and Save.
Stitch will perform a connection test to the Google CloudSQL PostgreSQL database; if successful, a Success! message will display at the top of the screen. Note: This test may take a few minutes to complete.
| Related | Troubleshooting |
Questions? Feedback?
Did this article help? If you have questions or feedback, feel free to submit a pull request with your suggestions, open an issue on GitHub, or reach out to us.