This integration is certified by Stitch. For support, contact Support.
Google Analytics integration summary
Stitch’s Google Analytics integration replicates data using the Google Analytics Reporting API v4. Refer to the Schema section for details about the data Stitch will replicate.
Note: A single Google Analytics integration is limited to 10 Metrics and 7 Dimensions. This is due to limits enforced by Google. Refer to Google’s documentation for more info.
Google Analytics feature snapshot
A high-level look at Stitch's Google Analytics (v14-09-2016) integration, including release status, useful links, and the features supported in Stitch.
| STITCH | |||
| Release status |
Deprecated on March 30, 2020 |
Supported by | |
| Stitch plan |
Standard |
API availability |
Not available |
| Singer GitHub repository |
Not applicable |
||
| REPLICATION SETTINGS | |||
| Anchor Scheduling |
Unsupported |
Advanced Scheduling |
Unsupported |
| Table-level reset |
Unsupported |
Configurable Replication Methods |
Unsupported |
| DATA SELECTION | |||
| Table selection |
Unsupported |
Column selection |
Unsupported |
| Select all |
Unsupported |
||
| TRANSPARENCY | |||
| Extraction Logs |
Unsupported |
Loading Reports |
Supported |
Connecting Google Analytics
Google Analytics setup requirements
To set up Google Analytics in Stitch, you need:
-
At least Read & Analyze permissions in the account you want to connect to Stitch. See Google’s documentation for more info.
-
To have recent data in the account you want to connect to Stitch. Verify that there is data from the past 30 days in the account before continuing.
-
To pause all ad-blocking software. Because Google authentication uses pop ups, you may encounter issues if ad blockers aren’t disabled during the setup.
Step 1: Add Google Analytics as a Stitch data source
- Sign into your Stitch account.
-
On the Stitch Dashboard page, click the Add Integration button.
-
Click the Google Analytics icon.
-
Enter a name for the integration. This is the name that will display on the Stitch Dashboard for the integration; it’ll also be used to create the schema in your destination.
For example, the name “Stitch Google Analytics” would create a schema called
stitch_google_analyticsin the destination. Note: Schema names cannot be changed after you save the integration.
Step 2: Define the historical replication start date
The Sync Historical Data setting defines the starting date for your Google Analytics integration. This means that data equal to or newer than this date will be replicated to your data warehouse.
Change this setting if you want to replicate data beyond Google Analytics’s default setting of 30 days. For a detailed look at historical replication jobs, check out the Syncing Historical SaaS Data guide.
Step 3: Create a replication schedule
In the Replication Frequency section, you’ll create the integration’s replication schedule. An integration’s replication schedule determines how often Stitch runs a replication job, and the time that job begins.
Google Analytics integrations support the following replication scheduling methods:
To keep your row usage low, consider setting the integration to replicate less frequently. See the Understanding and Reducing Your Row Usage guide for tips on reducing your usage.
Step 4: Authorize Stitch and select a Google Analytics profile
- Next, you’ll be prompted to log into your Google account and to approve Stitch’s access to your Google Analytics data. Note that we will only ever read your data.
- Click Allow to continue.
-
After your credentials are validated, you’ll be prompted to select the Google Analytics profile you want to connect to Stitch:
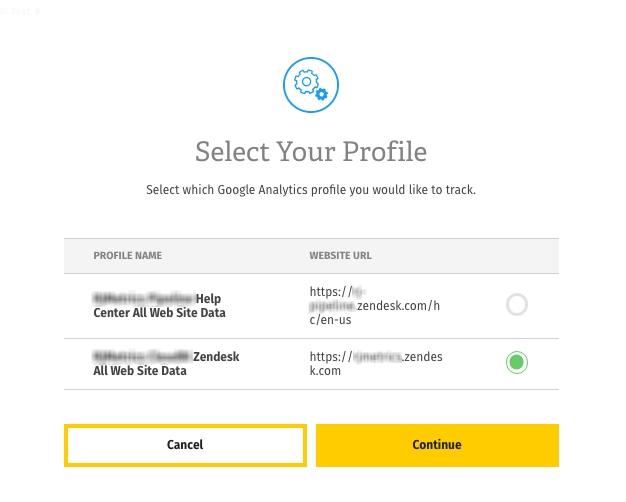
Remember: Profiles need to have Read & Analyze permissions to be detected by Stitch. If you don’t see the profile you want in this list, we recommend that you double-check the permission settings.
- When finished, click Continue.
Step 5: Select metrics and dimensions
Before you get started, note the following:
-
Metric/Dimension combos that adhere to Google’s compatibility rules can be saved. Stitch will display a notification if a conflict is found while adding Metrics and Dimensions. Integrations with incompatible Metric/Dimension combos can’t be saved.
We recommend creating additional Google Analytics integrations for different reports if you run into compatibility issues.
-
Metric/Dimension combos can’t be changed after the integration is saved. The Primary Key Stitch creates for Google Analytics integration tables is a composite key composed of the Dimensions selected during setup. Adding or removing Dimensions will change the Primary Key, potentially leading to issues with identifying new data for replication or de-duping data.
-
Google limits the number of Metrics and Dimensions you can select. You can select up to 10 Metrics and seven Dimensions per integration. Refer to Google’s documentation for more info on these limits.
-
Segments and Filters aren’t currently supported. If you’re interested in us adding these features, please get in touch with us.
-
Lifetime value and cohort metrics aren’t currently supported. If you’re interested in us adding these features, get in touch with us.
After you grant Stitch access to your Google Analytics profile, you can select the specific Metrics and Dimensions you want to replicate to your destination.
-
In the Metrics and Dimensions fields, you can search or use the drop-down to explore your options:
- Click the Metric or Dimension in the menu to add it to the configuration.
-
To add a Custom Metric or Dimension, type out the name exactly in its entirety. If you try to search for it and add a Metric/Dimension that looks like this -
ga:customMetricXX- you’ll run into issues.For example: let’s say you want to add
custom metric 10to the configuration. To add it, you would typega:metric10in the Choose Metrics field like this: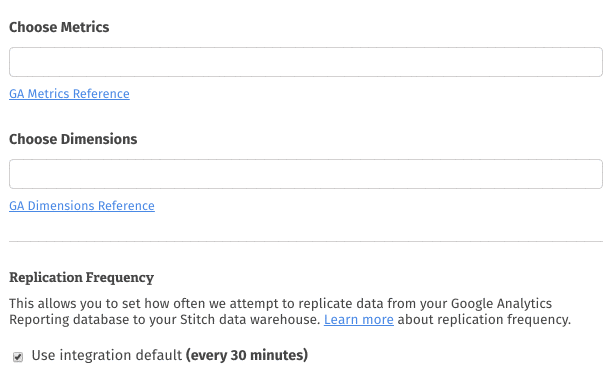 Tip: Not sure what the name of a custom Metric or Dimension is? Sign into your Google Analytics Dashboard and open the Custom Metrics or Dimensions page (Admin > Property Column > Custom Definitions > Custom Metric/Dimension).
In the row for the Metric or Dimension, take the number in the Index column and append it to eitherga:metricorga:dimension. For example: if the index for a custom Dimension is1, the name would bega:dimension1-
As you add Metrics and Dimensions, Stitch will check for compatibility. If there are any conflicts, you’ll need to resolve them before you can save the integration. Use Google’s Dimensions & Metrics Explorer as a guide when selecting Metrics and Dimensions.
-
Review your selections. Remember: once saved, Metrics and Dimensions can’t be added or removed.
-
When you’re finished, click Save Integration.
-
Initial and historical replication jobs
After you finish setting up Google Analytics, its Sync Status may show as Pending on either the Stitch Dashboard or in the Integration Details page.
For a new integration, a Pending status indicates that Stitch is in the process of scheduling the initial replication job for the integration. This may take some time to complete.
Initial replication jobs with Anchor Scheduling
If using Anchor Scheduling, an initial replication job may not kick off immediately. This depends on the selected Replication Frequency and Anchor Time. Refer to the Anchor Scheduling documentation for more information.
Free historical data loads
The first seven days of replication, beginning when data is first replicated, are free. Rows replicated from the new integration during this time won’t count towards your quota. Stitch offers this as a way of testing new integrations, measuring usage, and ensuring historical data volumes don’t quickly consume your quota.
Google Analytics replication
Every time Stitch runs a replication job for Google Analytics, the last 15 days’ worth of data will be replicated.
This is applicable to all tables in the integration.
Stitch replicates data in this way to account for updates made to existing records within the default attribution window of 15 days, thus ensuring you won’t make decisions based on stale (or false) data. As a result, you may see a higher number of replicated rows than what’s being generated in Google Analytics.
Setting the Replication Frequency to a higher frequency - like 30 minutes - can result in re-replicating recent data and contribute to greater row usage. Selecting a lower frequency can help keep your row count low.
Google Analytics table reference
Schemas and versioning
Schemas and naming conventions can change from version to version, so we recommend verifying your integration’s version before continuing.
The schema and info displayed below is for version 14-09-2016 of this integration.
Table and column names in your destination
Depending on your destination, table and column names may not appear as they are outlined below.
For example: Object names are lowercased in Redshift (CusTomERs > customers), while case is maintained in PostgreSQL destinations (CusTomERs > CusTomERs). Refer to the Loading Guide for your destination for more info.
sample_report
The sample_report table will contain the Metrics and Dimensions selected during integration setup.
Data pagination
Google Analytics data is paginated on a daily basis. This means that a single row in this table pertains to a specific day. Use the start_date and end_date columns to identify what day the row is for.
Primary keys
The Primary Key for this table is a composite key made up of all Dimension columns and the start_date and end_date columns.
For example: If referralPath and country were Dimension columns in the table, both columns, along with start_date and end_date would make up the Primary Key for the table.
|
Key-based Incremental |
|
|
Primary Keys |
start_date end_date |
|
Replication Key |
start_date |
|
end_date
DATE-TIME |
|
start_date
DATE-TIME |
| Related | Troubleshooting |
Questions? Feedback?
Did this article help? If you have questions or feedback, feel free to submit a pull request with your suggestions, open an issue on GitHub, or reach out to us.