Prerequisites
-
An up-and-running Amazon Aurora MySQL instance. Instructions for creating a Amazon Aurora MySQL destination are outside the scope of this tutorial; our instructions assume that you have an instance up and running. For help getting started with Amazon Aurora MySQL, refer to AWS’s documentation.
A database that uses the InnoDB storage engine. This is the default storage engine for all supported Amazon Aurora MySQL versions and the only one supported by Stitch’s Amazon Aurora MySQL destination.
Step 1: Verify your Stitch account's data pipeline region
First, you’ll log into Stitch and verify the data pipeline region your account is using. Later in this guide, you’ll need to grant Stitch access by whitelisting our IP addresses.
The IP addresses you’ll whitelist depend on the Data pipeline region your account is in.
- Sign into your Stitch account, if you haven’t already.
- Click User menu (your icon) > Edit User Settings and locate the Data pipeline region section to verify your account’s region.
-
Locate the list of IP addresses for your region:
Keep this list handy - you’ll need it later.
Step 2: Configure database connection settings
In this step, you’ll configure the database server to allow traffic from Stitch to access it. There are two ways to connect your database:
- A direct connection will work if your database is publicly accessible.
- An SSH tunnel is required if your database isn’t publicly accessible. This method uses a publicly accessible instance, or an SSH server, to act as an intermediary between Stitch and your database. The SSH server will forward traffic from Stitch through an encrypted tunnel to the private database.
Click the option you’re using below and follow the instructions.
For Stitch to successfully connect with your database instance, you’ll need to add our IP addresses to the appropriate Security Group via the AWS management console.
Security Groups must reside in the same VPC as the instance. Use the instructions below to create a security group for Stitch and grant access to the VPC.
- Log into your AWS account.
- Navigate to the Security Group Management page, typically Services > Compute > EC2.
- Click the Security Groups option, under Network & Security in the menu on the left side of the page.
- Click Create Security Group.
- In the window that displays, fill in the fields as follows:
- Security group name: Enter a unique name for the Security Group. For example:
Stitch - Description: Enter a description for the security group.
- VPC: Select the VPC that contains the database you want to connect to Stitch. Note: The Security Group and database must be in the same VPC, or the connection will fail.
- Security group name: Enter a unique name for the Security Group. For example:
- In the Inbound tab, click Add Rule.
- Fill in the fields as follows:
- Type: Select
Custom TCP Rule - Port Range: Enter the port your database uses. (
3306by default) - CIDR, IP or Security Group: Paste one of the Stitch IP addresses for your Stitch data pipeline region that you retrieved in Step 1.
- Type: Select
- Click Add Rule to add an additional Inbound rule.
-
Repeat steps 6-8 until all the IP addresses for your Stitch data pipeline region have been added.
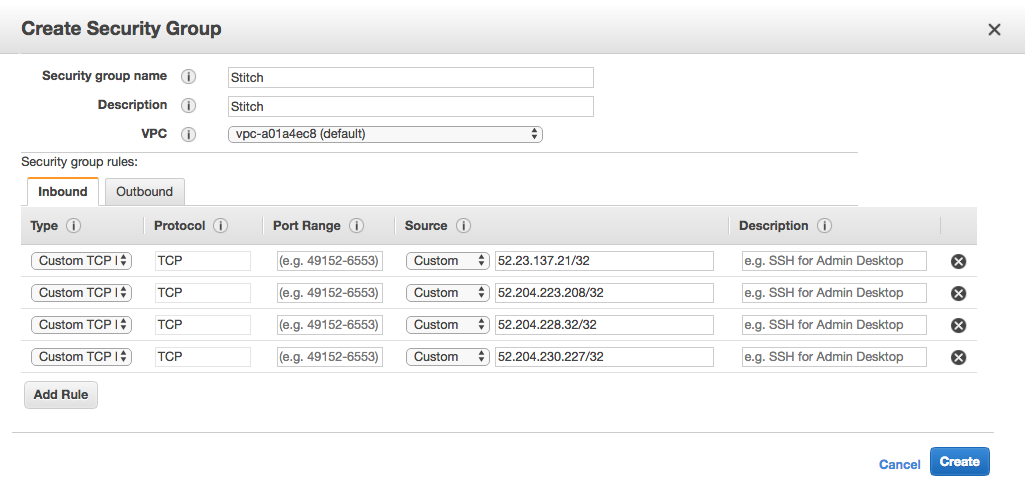
This is what a Security Group using Stitch’s North America IP addresses looks like:
- When finished, click Create to create the Security Group.
- Follow the steps in the Setting up an SSH Tunnel for a database in Amazon Web Services guide to set up an SSH tunnel for Amazon Aurora MySQL.
- Complete the steps in this guide after the SSH setup is complete.
Step 3: Create a Stitch Amazon Aurora MySQL database user
In the following tabs are the instructions for creating a Stitch Amazon Aurora MySQL database user and explanations for the permissions Stitch requires.
-
If you haven’t already, connect to your Amazon Aurora MySQL instance using your SQL client.
-
Run the following commands to create a login and a user named
stitch. Replace<STRONG_PASSWORD_HERE>with a strong password.:CREATE USER 'stitch'@'%' IDENTIFIED BY '<STRONG_PASSWORD_HERE>'; -
Run the following command to grant the required privileges to the Stitch user:
GRANT ALTER, CREATE, CREATE TEMPORARY TABLES, DELETE, DROP, EXECUTE, INSERT, SELECT, UPDATE ON *.* TO 'stitch'@'%';
In the table below are the database user privileges Stitch requires to connect to and load data into Amazon Aurora MySQL.
| Privilege name | Reason for requirement |
| ALTER |
Required to edit tables. |
| CREATE |
Required to create databases and tables. |
| CREATE TEMPORARY TABLES |
Required to create temporary tables. |
| DELETE |
Required to delete rows from database tables. |
| DROP |
Required to delete databases and tables. |
| EXECUTE |
Required to execute routines. |
| INSERT |
Required to insert rows in database tables. |
| SELECT |
Required to select rows from database tables. |
| UPDATE |
Required to update rows in database tables. |
Step 4: Enable local data loading
To allow Stitch to stream data from the cloud into your destination, you need to enable the local_infile parameter in MySQL.
- Check if the feature is already enabled. You can:
- Look for the
local_infileparameter in yourmy.cnfconfiguration file. - Run the following command from the command line:
show global variables like 'local_infile';
- Look for the
- If the feature is disabled, enable it. To do so, you can:
- Append the following line in
my.cnf, after the[mysqld]tag. If this tag does not exist, create it. It should look like this:[mysqld] local_infile=true - Run the following command while logged in with your root user:
set global local_infile=true
- Append the following line in
- If you are using a supported Amazon Aurora MySQL version older than
8.0(from5.7.8to5.7.37), you may run into errors stating that you are loading invalid UTF-8 characters. To avoid this issue, append the following lines inmy.cnf:[mysql] default-character-set=utf8mb4 [mysqld] character-set-server=utf8mb4 collation-server=utf8mb4_general_ciIf the
[mysql]and[mysqld]tags already exist in the file, add the the values after each tag, otherwise add both the tags and values. - Restart your database server to apply the changes.
For more information, see the MySQL documentation.
Step 5: Connect Stitch
To complete the setup, you need to enter your Amazon Aurora MySQL connection details into the Destination Settings page in Stitch.
Step 5.1: Enter connection details into Stitch
- If you aren’t signed into your Stitch account, sign in now.
-
Click the Destination tab.
- Locate and click the Amazon Aurora MySQL icon.
- Fill in the fields as follows:
Step 5.2: Define SSH connection details
If you’re using an SSH tunnel to connect your Amazon Aurora MySQL database to Stitch, you’ll also need to define the SSH settings. Refer to the Setting up an SSH Tunnel for a database in Amazon Web Services guide for assistance with completing these fields.
- Click the Encryption Type menu.
-
Select SSH to display the SSH fields.
-
Fill in the fields as follows:
-
Remote Address: Paste the Public DNS of the SSH sever (EC2 instance) into this field. Refer to the Amazon SSH guide for instructions on retrieving this info.
-
SSH Port: Enter the SSH port of the SSH server (EC2 instance) into this field. This will usually be
22. -
SSH User: Enter the Stitch Linux (SSH) user’s username.
-
Step 5.3: Define SSL connection details
-
Check the Connect using SSL checkbox. Note: The database must support and allow SSL connections for this setting to work correctly.
-
Fill in the fields as follows:
-
SSL Certificate: Optional: Provide the certificate (typically a CA or server certificate) Stitch should verify the SSL connection against. The connection will succeed only if the server’s certificate verifies against the certificate provided here.
Note: Providing a certificate isn’t required to use SSL. This is only if Stitch should verify the connection against a specific certificate.
-
Step 5.4: Save the destination
When finished, click Check and Save.
Stitch will perform a connection test to the Amazon Aurora MySQL database; if successful, a Success! message will display at the top of the screen. Note: This test may take a few minutes to complete.
| Related | Troubleshooting |
Questions? Feedback?
Did this article help? If you have questions or feedback, feel free to submit a pull request with your suggestions, open an issue on GitHub, or reach out to us.