Prerequisites
-
An up-and-running Azure SQL Managed Instance instance. Instructions for creating a Azure SQL Managed Instance destination are outside the scope of this tutorial; our instructions assume that you have an instance up and running. For help getting started with Azure SQL Managed Instance, refer to Microsoft’s documentation.
Step 1: Verify your Stitch account's data pipeline region
First, you’ll log into Stitch and verify the data pipeline region your account is using. Later in this guide, you’ll need to grant Stitch access by whitelisting our IP addresses.
The IP addresses you’ll whitelist depend on the Data pipeline region your account is in.
- Sign into your Stitch account, if you haven’t already.
- Click User menu (your icon) > Edit User Settings and locate the Data pipeline region section to verify your account’s region.
-
Locate the list of IP addresses for your region:
Keep this list handy - you’ll need it later.
Step 2: Configure database connection settings
In this step, you’ll configure the database server to allow traffic from Stitch to access it. There are two ways to connect your database:
- A direct connection will work if your database is publicly accessible.
- An SSH tunnel is required if your database isn’t publicly accessible. This method uses a publicly accessible instance, or an SSH server, to act as an intermediary between Stitch and your database. The SSH server will forward traffic from Stitch through an encrypted tunnel to the private database.
Click the option you’re using below and follow the instructions.
For the connection from Stitch to be successful, you’ll need to configure the firewall for your Azure SQL Managed Instance instance to allow access from our IP addresses.
-
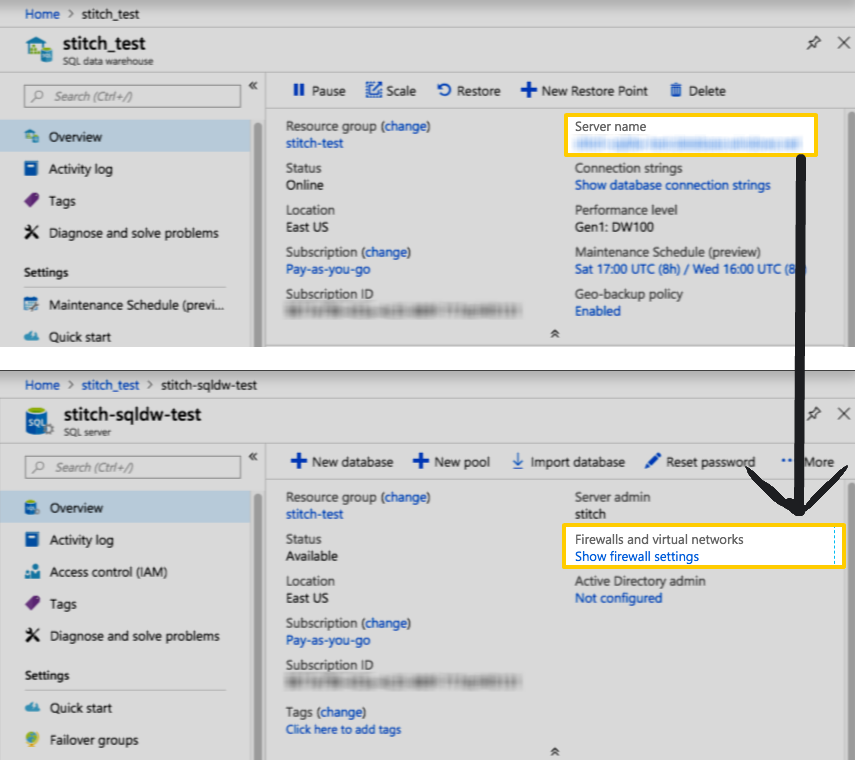
Sign into your Azure SQL Managed Instance account and navigate to your dashboard.
- In the sidenav, click SQL databases.
- On the page that displays, click the name of the database you want to connect to Stitch.
- The details page for the database will display. Click the link in the Server name field.
-
The details page for the server will display. Click the Show firewall settings link in the Firewalls and virtual networks field.
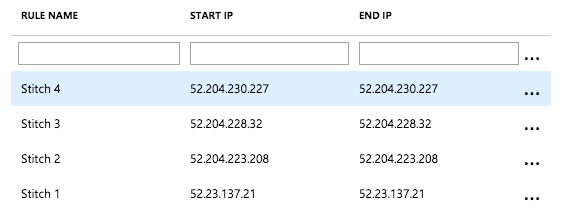
- For each of the IP addresses you retrieved in Step 1 for your Stitch data pipeline region, create a rule:
- Rule name: Enter a name for the rule. For example:
Stitch<number> - Start IP: Paste one of the Stitch data pipeline region IP addresses.
- End IP: Paste the same IP address.
- Rule name: Enter a name for the rule. For example:
- Click the three dots to the right of the End IP field to add the rule.
-
Repeat steps 6 and 7 until there is a rule for each IP address for your Stitch data pipeline region. Below is an example of what this might look like using Stitch’s North America IP addresses:
Note: You may also want to add your own IP address(es) to this list. This ensures that you’ll also be able to connect to the database as needed.
- Click Save.
- Follow the steps in the Setting up an SSH Tunnel for a Microsoft Azure database guide to set up an SSH tunnel for Azure SQL Managed Instance.
- Complete the steps in this guide after the SSH setup is complete.
Step 3: Create a Stitch Azure SQL Managed Instance database user
In the following tabs are the instructions for creating a Stitch Azure SQL Managed Instance database user and explanations for the permissions Stitch requires.
-
If you haven’t already, connect to your Azure SQL Managed Instance instance using your SQL client.
-
Navigate to the
masterdatabase. -
In the
masterdatabase, run the following commands to create a login and a user namedstitch. Replace<STRONG_PASSWORD_HERE>with a strong password:CREATE LOGIN stitch WITH PASSWORD = '<STRONG_PASSWORD_HERE>'; CREATE USER stitch FOR LOGIN stitch; -
Next, navigate to the database where you want Stitch to load data.
-
In this database, run the following commands to create a login and a database user named
stitch. Replace<DATABASE_NAME>with the name of the database:CREATE USER stitch FOR LOGIN stitch; GRANT CONTROL ON DATABASE::<DATABASE_NAME> to stitch; -
Run the following commands to allow the user to create tables and schemas:
GRANT CREATE TABLE ON DATABASE::<DATABASE_NAME> to stitch;
GRANT CREATE SCHEMA ON DATABASE::<DATABASE_NAME> to stitch;
In the table below are the database user privileges Stitch requires to connect to and load data into Azure SQL Managed Instance.
| Privilege name | Reason for requirement |
| CONTROL |
Required to create the necessary database objects to load and store your data. The |
| CREATE TABLE |
Required to create tables in the database. |
| CREATE SCHEMA |
Required to create schemas in the database. |
Step 4: Connect Stitch
To complete the setup, you need to enter your Azure SQL Managed Instance connection details into the Destination Settings page in Stitch.
Step 4.1: Enter connection details into Stitch
- If you aren’t signed into your Stitch account, sign in now.
-
Click the Destination tab.
- Locate and click the Azure SQL Managed Instance icon.
- Fill in the fields as follows:
Step 4.2: Define SSH connection details
If you’re using an SSH tunnel to connect your Azure SQL Managed Instance database to Stitch, you’ll also need to define the SSH settings. Refer to the Setting up an SSH Tunnel for a Microsoft Azure database guide for assistance with completing these fields.
- Click the Encryption Type menu.
-
Select SSH to display the SSH fields.
-
Fill in the fields as follows:
-
Remote Address: Enter the public IP address or hostname of the server Stitch will SSH into.
-
SSH Port: Enter the SSH port on your server. (
22by default) -
SSH User: Enter the Stitch Linux (SSH) user’s username.
-
Step 4.3: Define SSL connection details
Check the Connect using SSL checkbox. Note: The database must support and allow SSL connections for this setting to work correctly.
Step 4.4: Save the destination
When finished, click Check and Save.
Stitch will perform a connection test to the Azure SQL Managed Instance database; if successful, a Success! message will display at the top of the screen. Note: This test may take a few minutes to complete.
| Related | Troubleshooting |
Questions? Feedback?
Did this article help? If you have questions or feedback, feel free to submit a pull request with your suggestions, open an issue on GitHub, or reach out to us.