Prerequisites
An Amazon Web Services (AWS) account. Signing up is free - click here or go to
https://aws.amazon.comto create an account if you don’t have one already.Permissions to create and manage S3 buckets in AWS. Your AWS user must be able to create a bucket (if one doesn’t already exist), add/modify bucket policies, and upload files to the bucket.
An up and running Amazon S3 bucket. Instructions for creating a bucket using the AWS console are in Step 1 of this guide.
Step 1: Create an Amazon S3 bucket
- Sign into AWS.
- Click Services near the top-left corner of the page.
- Under the Storage option, click S3. A page listing all buckets currently in use will display.
- Click the + Create Bucket button.
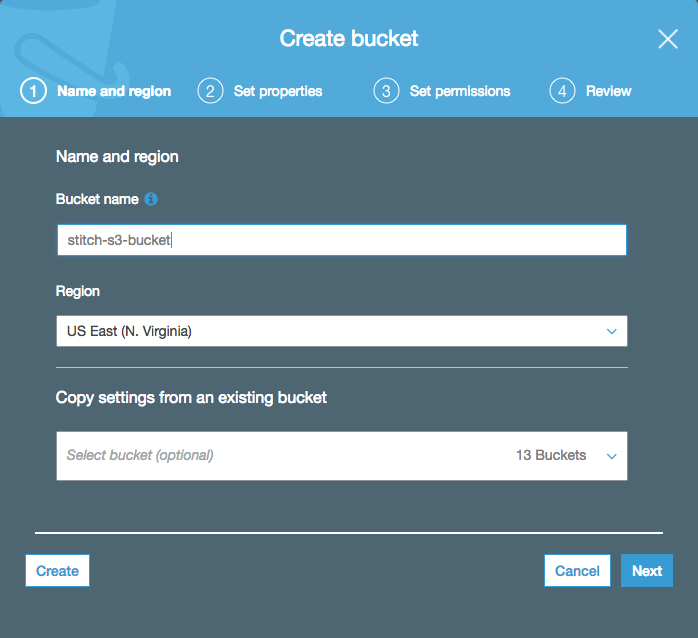
- On the first screen, Name and region, complete the following:
- Bucket name: Enter a DNS-compliant name for the bucket.
- Region: Select the region you want the bucket to be located in.
- When finished, click Next.
- As Stitch doesn’t require any particular configuration, how you define the settings in the Set properties and Set permissions screens are up to you. Follow the on-screen prompts to complete these steps.
- When you reach the Review screen, verify that all the bucket’s information and settings are correct.
- When ready, click Create bucket.
Step 2: Define the bucket settings in Stitch
Step 2.1: Define the bucket name and data storage format
- If you aren’t signed into your Stitch account, sign in now.
-
Click the Destination tab.
- Locate and click the Amazon S3 icon.
-
Fill in the fields as follows:
-
Display Name: Enter a display name for your destination, to distinguish various connections of the same type.
-
Description (optional): Enter a description for your destination.
-
Bucket Name: Enter the name of bucket. Enter only the bucket name: No URLs,
https, or S3 parts. For example:com-test-stitch-bucket -
Store Data in This Format: The data storage format defines the type of file Stitch will write to your Amazon S3 bucket. For examples of how data in each format will be stored, click here.
Supported options are:
- JSON: Data will be stored as JSON files (
.jsonl) - CSV: Data will be stored as CSV files (
.csv). If selected, additional configuration options will be displayed.
- JSON: Data will be stored as JSON files (
-
Delimiter: Applicable only if the data storage format is
csv. Select the delimiter you want to use. Stitch will use the comma (,) option by default, but you may also use pipes (|) and tabs (\t). -
Quote all elements in key-value pairs: Applicable only if the data storage format is
csv. If selected, Stitch will place all elements of key-value pairs in quotes. For example: Numerical fields will appear as"123"instead of123.
-
Step 2.2: Define S3 Object Key
In Amazon S3, Object Keys are used to uniquely identify objects in a given bucket.
The Object Key setting in Stitch determines the convention used to create Object Keys when Stitch writes to your bucket. For example: If the default Key is used:
[integration_name]/[table_name]/[table_version]_[timestamp_loaded].[csv|jsonl]
This could create an object with an Object Key of:
salesforce-prod/account/1_1519235654474.[csv|jsonl]
You can opt to use the default Key, which is pre-populated, or define your own using the elements in the next section.
S3 Key Elements
The following elements are available to construct an S3 Key:
| Required Elements | Optional Elements |
All of the following elements must be included in the S3 Key, in any order:
|
The following elements are optional:
|
Additionally, keep in mind that Keys cannot exceed 500 characters or include spaces or special characters (!@#$%^&*).
As you update the values in the S3 Key field, Stitch will validate the entry. If the Key doesn’t include all required elements or contains spaces or special characters, you will be prompted to make corrections.
After you’ve finished defining the Key, click Continue.
Step 3: Grant and verify bucket access
Next, Stitch will display a Grant & Verify Access page. This page contains the info you need to configure bucket access for Stitch, which is accomplished via a bucket policy. A bucket policy is JSON-based access policy language to manage privileges to bucket resources.
Note: The policy Stitch provides is an auto-generated policy unique to the specific bucket you entered in the setup page. It allows Stitch to assume a role and access the bucket.
Step 3.1: Add the Stitch bucket policy
To allow Stitch to access the bucket, you’ll need to add a bucket policy using the AWS console. Follow the instructions in the tab below to add the bucket policy.
-
Sign into AWS in another tab, if you aren’t currently logged in.
-
Click Services near the top-left corner of the page.
-
Under the Storage option, click S3.
-
A page listing all buckets currently in use will display. Click the name of the bucket you want to connect to Stitch.
-
Click the Permissions tab.
-
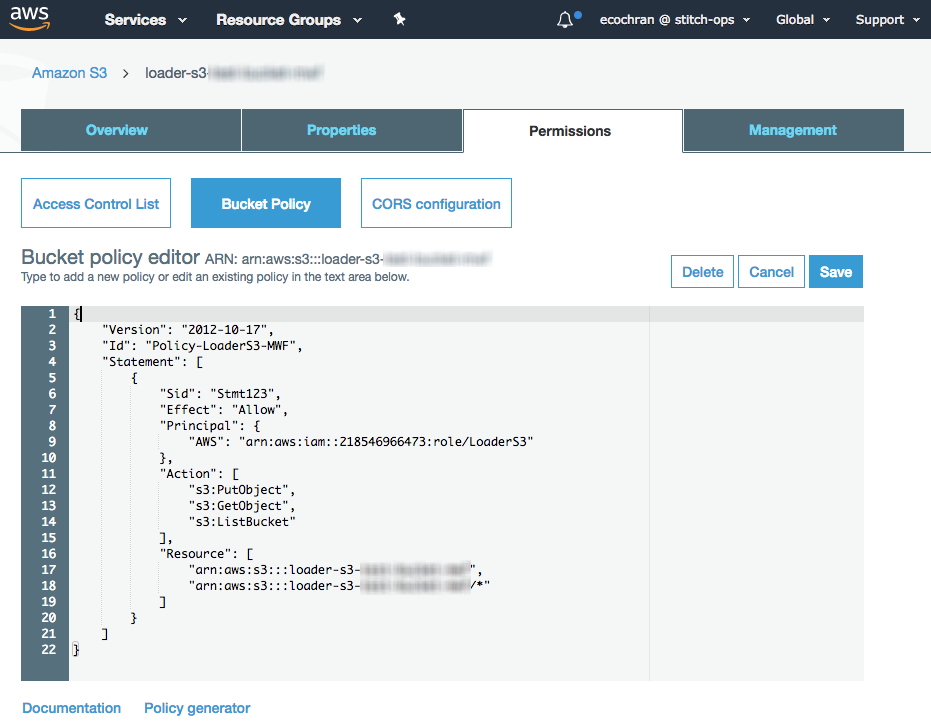
In the Permissions tab, click the Bucket Policy button.
-
In the Bucket policy editor, paste the bucket policy for your Stitch data pipeline region and replace
<YOUR-BUCKET-NAME>with the name of your S3 bucket.Not sure what your Stitch data pipeline region is? Click here for help.
North America (us-east-1) bucket policy{ "Version": "2012-10-17", "Id": "", "Statement": [ { "Sid": "", "Effect": "Allow", "Principal": { "AWS": [ "arn:aws:iam::218546966473:role/LoaderS3" ] }, "Action": [ "s3:PutObject", "s3:GetObject", "s3:ListBucket" ], "Resource": [ "arn:aws:s3:::<YOUR_BUCKET_NAME>", "arn:aws:s3:::<YOUR_BUCKET_NAME>/*" ] } ] }Europe (eu-central-1) bucket policy{ "Version": "2012-10-17", "Id": "", "Statement": [ { "Sid": "", "Effect": "Allow", "Principal": { "AWS": [ "arn:aws:iam::218546966473:role/LoaderS3_eu_central_1" ] }, "Action": [ "s3:PutObject", "s3:GetObject", "s3:ListBucket" ], "Resource": [ "arn:aws:s3:::<YOUR_BUCKET_NAME>", "arn:aws:s3:::<YOUR_BUCKET_NAME>/*" ] } ] } -
When finished, click Save.
Leave this page open for now - you’ll come back to it in the next step.
In the table below are the database user privileges Stitch requires to connect to and load data into Amazon S3.
| Privilege name | Reason for requirement |
| s3:PutObject |
Required to add objects, such as files, to an S3 bucket. Granting the |
| s3:GetObject |
Required to read objects in an S3 bucket. Granting the |
| s3:ListBucket |
Required to determine if an S3 bucket exists, if access is allowed to the bucket is allowed, and to list the objects in the bucket. Granting the |
Step 3.2: Verify bucket access
Next, to ensure that Stitch can access the bucket, you’ll create a blank file that Stitch will use to test the permissions settings.
-
In Stitch, just below the bucket policy code, is the Verify your bucket section. In this section is a field containing the unique name of the test file you need to create:
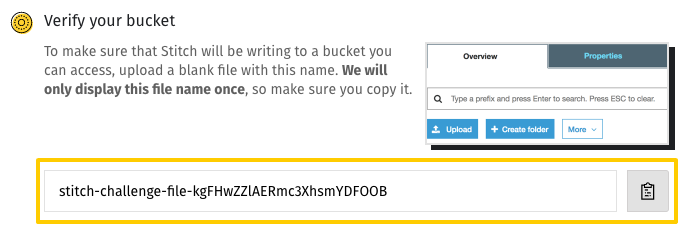
Note: This file name will only display once. If you navigate out of this screen without saving the file name, you’ll need to start over.
-
Create a blank file using the name displayed in this field. Do not save the file with an extension (file type) like
.csvor.txt. In the image below, notice that there isn’t any kind of file extension after the challenge file name: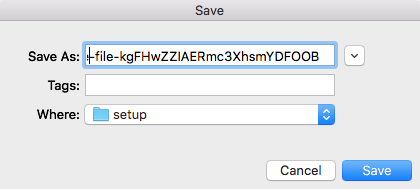
- Switch back to the AWS console and click the Overview tab.
- Click the Upload button and follow the prompts to upload the file.
- After the file has been uploaded to the bucket, switch back to where you have Stitch open.
- Click Check and Save to save and test the connection to Amazon S3.
Important: The challenge file must remain in your S3 bucket
The challenge file must remain in the bucket even after the initial setup. If the file isn’t created, or is removed at any point after the setup, you’ll receive this error: An error occurred (404) when calling the HeadObject operation: Not Found
For troubleshooting, refer to the Destination Connection Errors guide.
| Related | Troubleshooting |
Questions? Feedback?
Did this article help? If you have questions or feedback, feel free to submit a pull request with your suggestions, open an issue on GitHub, or reach out to us.