Stitch Admin privileges required
Setting up or modifying an existing Google Workspace connection requires Admin privileges in Stitch. Refer to the Team member roles and permissions documentation for more info about privileges in Stitch.
Connect your Google Workspace account to Stitch and enable Single Sign-On (SSO).
In this guide, we’ll cover:
Prerequisites
Admin privileges in Stitch. Refer to the Team member roles and permissions documentation for more info about privileges in Stitch.
Super Admin privileges in Google Workspace that allow you to add and configure applications. If you don’t have these privileges, contact a Google Workspace admin before continuing.
Refer to Google Workspace’s documentation for more info.
Step 1: Create and configure an Google Workspace app
Step 1.1: Retrieve your SSO info from Stitch
- Sign into your Stitch account.
- Click User menu (your icon) > Edit User Settings.
-
Scroll down to the Single Sign-on section and click Enable SSO.
- Select Google Workspace from the SSO Provider menu.
- Click Continue.
- The Configure Your Google Workspace SSO page will display.
Leave this page open - you’ll need it to complete the setup.
Step 1.2: Create the app in Google Workspace
- Sign into your Google Admin Console.
- From the Admin console home page, click Apps > Web and mobile apps.
- Click Add App > Add custom SAML app.
- On the App Details page, enter the name of the custom app. Optionally, upload an app icon.
- Click Continue.
- On the Google Identity Provider details page, get the setup information needed by the service provider (Stitch) and select the option for downloading the IDP metadata. This will be used later for the Stitch SSO configuration steps.
- Click Continue.
Step 1.3: Configure SAML for the app
Next, you’ll configure SAML for the app starting from the Service Provider Details window:
Step 1.3.1: Define the General settings
In the Service Provider Details window, enter an:
- ACS URL
- Entity ID
- StartURL (if needed)
The ACS URL and SP Entity ID will come from the Stitch SSO configuration screen in the Stitch App (the browser tab you should still have open). Copy those values into the corresponding fields on the Google Workspace SAML app configuration screen, and then click Continue.
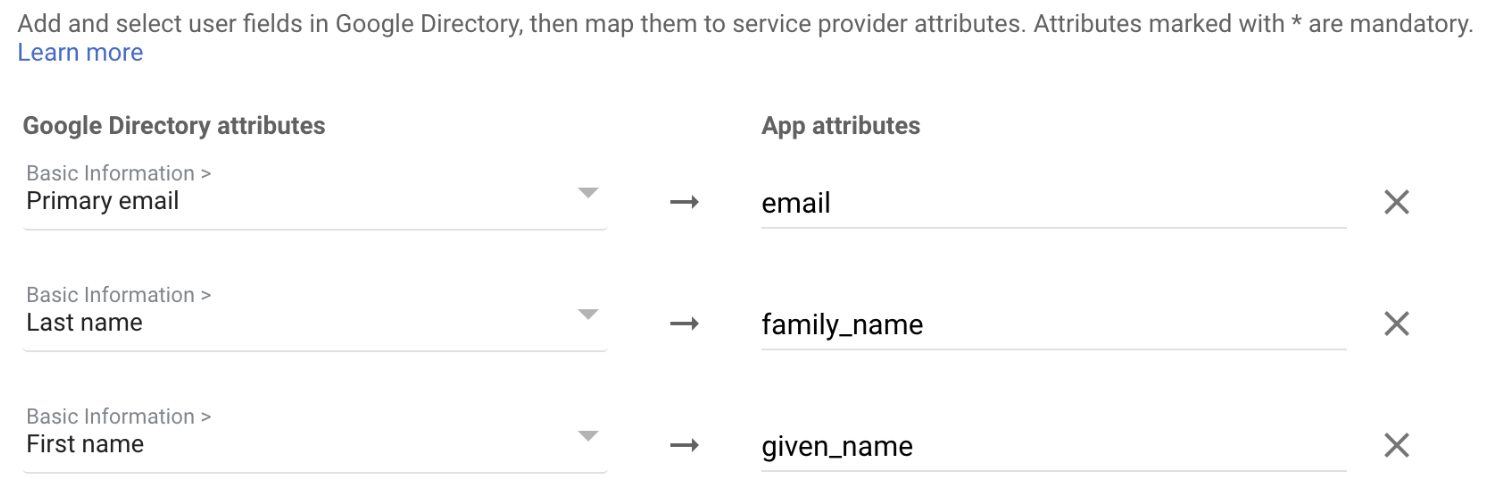
Step 1.3.2: Define the Attribute Statements
Next, you’ll add the required attributes for the app:
| # | SAML Attribute Name | Value |
| 1 | given_name | First Name |
| 2 | family_name | Last Name |
| 3 | Primary Email |
To add the attributes:
- Click Add another mapping.
- In the Google Directory attributes field, select the corresponding Value from the dropdown. For example:
First Nameis the value for the SAML Attributegiven_name. - In the App attribues field, enter the SAML Attribute Name of the parameter. For example:
given_name. - Click Add another mapping to add the next attribute.
-
Repeat steps 2-4 until all attributes have been added. This is how the section should look when all the parameters have been added:
- When complete, click Finish.
Step 1.4: Grant users access to the app
The last step to configuring the app is to grant access to users in your Google Workspace instance. This ensures that they’ll be able to access Stitch via SSO.
Using the process your organization follows, grant Stitch Google Workspace app access to your colleagues.
Step 2: Connect to Stitch
Navigate back to the page where your Stitch account is open.
- In Stitch, scroll down to the Connect to Stitch section of the Google Workspace setup page.
- Click Upload SAML Metadata.
- Locate and select the
GoogleIDPMetadata.xmlfile you downloaded in Step 1.2.
Step 3: Activate SSO
When finished, click the Activate SSO button.
Next steps
After you’ve enabled SSO for your Stitch account, remember to grant Stitch access to users in your Google Workspace instance, if you haven’t already.
| Related | Troubleshooting |
Questions? Feedback?
Did this article help? If you have questions or feedback, feel free to submit a pull request with your suggestions, open an issue on GitHub, or reach out to us.