Stitch Admin privileges required
Setting up or modifying an existing Azure AD connection requires Admin privileges in Stitch. Refer to the Team member roles and permissions documentation for more info about privileges in Stitch.
Connect your Microsoft Azure Active Directory account to Stitch and enable Single Sign-On (SSO).
In this guide, we’ll cover:
Prerequisites
Admin privileges in Stitch. Refer to the Team member roles and permissions documentation for more info about privileges in Stitch.
Privileges in Azure AD that allow you to add, configure, and register applications. If you don’t have these privileges, contact an Azure AD admin before continuing.
Step 1: Create and configure an Azure AD SAML app
Step 1.1: Retrieve your SSO info from Stitch
- Sign into your Stitch account.
- Click User menu (your icon) > Edit User Settings.
-
Scroll down to the Single Sign-on section and click Enable SSO.
- Select Azure Active Directory SAML from the SSO Provider menu.
- Click Continue.
- The Configure Your Azure Active Directory SAML SSO page will display.
Leave this page open - you’ll need it to complete the setup.
Step 1.2: Create the app in Azure AD
- Sign into your Microsoft Azure account.
-
In the search bar, enter
azure active directoryand click the Azure Active Directory result:
- On the page that displays, verify you’re in the correct tenant before proceeding. Otherwise, click Switch tenant and navigate to the correct tenant.
- In the left sidenav, click Manage > Enterprise applications.
- On the page that displays, click + New application. This will open the Azure AD Gallery page.
- Click + Create your own application.
-
In the window that displays, fill in the fields as follows:
- Enter a name for the app. For example:
Stitch Data Loader -
Check Integrate any other application you don’t find in the gallery (Non-gallery)
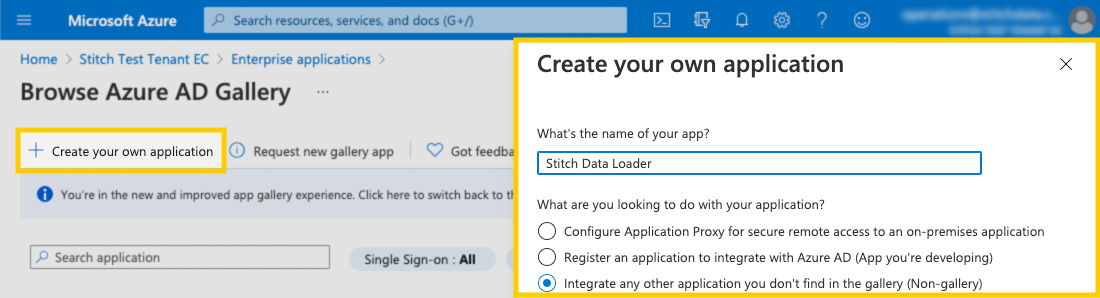
- Enter a name for the app. For example:
- When finished, click Create.
It may take a few minutes for the app to be created. When it’s finished, you’ll be redirected to the app’s Overview page.
Step 1.3: Configure the app's Single Sign-on method using SAML
Step 1.3.1: Define the basic SAML configuration
- On the app’s Overview page, click Manage Single-sign on in the left sidenav.
- On the Select a single sign-on method page, click SAML.
-
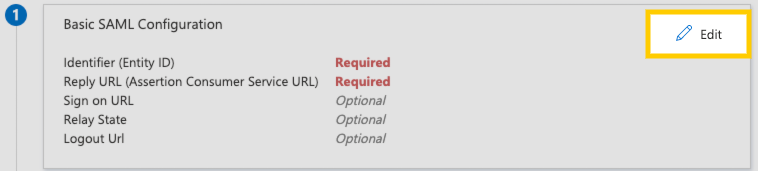
On the page that displays, click Basic SAML Configuration > Edit:
- In the window that displays, fill in the fields as follows:
-
Identifier (Entity ID): Copy and paste the Identifier (Entity ID) value from Stitch into this field and check the Default checkbox.
Note: You can leave or remove the initial default
adapplicationregistryEntity ID. If you leave it, verify that the Default box is checked next to the value from Stitch. -
Reply URL: Copy and paste the Reply URL value from Stitch into this field and check the Default checkbox.
The page should look similar to the following:
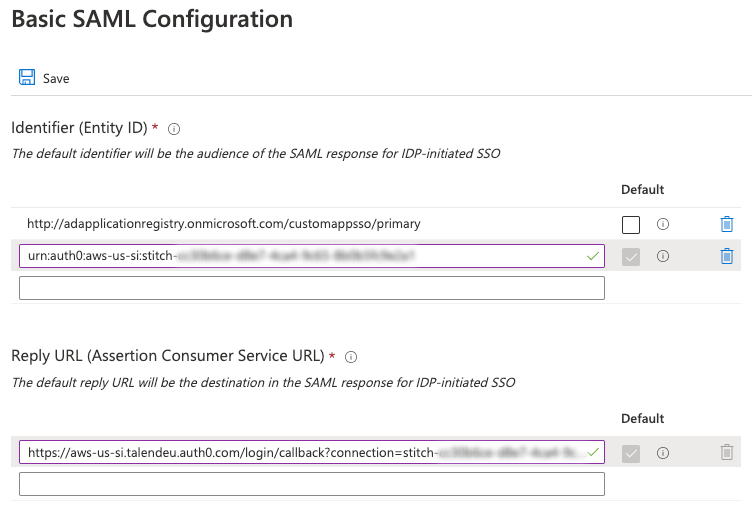
-
- When finished, click Save. You’ll be redirected back to the app’s Set up Single Sign-On with SAML page.
Step 1.3.2: Define the user attributes and claims
Next, you’ll define the user attributes for the app:
| # | SAML Attribute Name | Value |
| 1 | given_name | user.givenname |
| 2 | family_name | user.surname |
| 3 | user.mail |
By default, Azure AD applications are created with user attributes. To make Azure AD work with Stitch, you’ll need to modify the default attributes so they map to the correct attributes in Stitch. Note: If preferred, you can delete the default attributes and re-create them, as long as the claim names and values match the table above.
To modify the default attributes:
- On the app’s Set up Single Sign-On with SAML page, click User Attributes & Claims > Edit. This opens the User Attributes & Claims page.
- For each of the attributes in the table above, perform the following:
- In the Additional claims section, click a claim. For example:
user.mail -
On the Manage claim page, edit the Name field to match the corresponding SAML Attribute Name value in the table above. For example: For
user.mail, the Name value should beemail: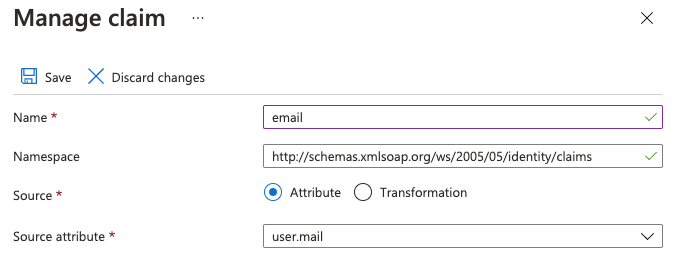
- When finished, click Save.
- In the Additional claims section, click a claim. For example:
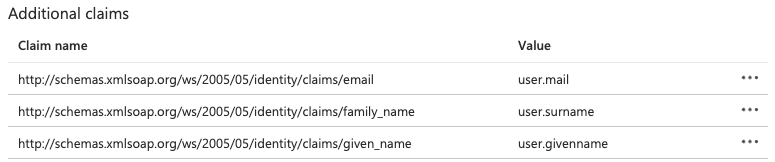
When all the user attributes have been modified, the Addtional claims section should look like the following:
Step 1.3.3: Download the app's federation metadata XML file
The last step to configuring the app’s SAML is to download its SAML metadata file, or the Federation Metadata XML file. This is required to connect your Azure AD app with Stitch and enable SSO.
Note: Downloading this file before completing the previous steps will result in errors in Stitch.
- In the Set up Single Sign-On with SAML page, scroll to the SAML Signing Certificate section.
- Next to the Federation Metdata XML field, click the Download link.
- Save the file somewhere handy - you’ll need it to complete the setup in Stitch.
Step 1.4: Configure the app's permissions
- Navigate back to your Azure tenant’s Overview page. This will typically be the first link after Home in the breadcrumbs near the top of the page.
- In the left sidenav, click Manage > App registrations.
- In the All applications tab, click the app you created in Step 1.2.
- In the left sidenav, click Manage > API permissions.
- On the API permissions page, click + Add a permission.
- Click Microsoft Graph, then Delegated permissions.
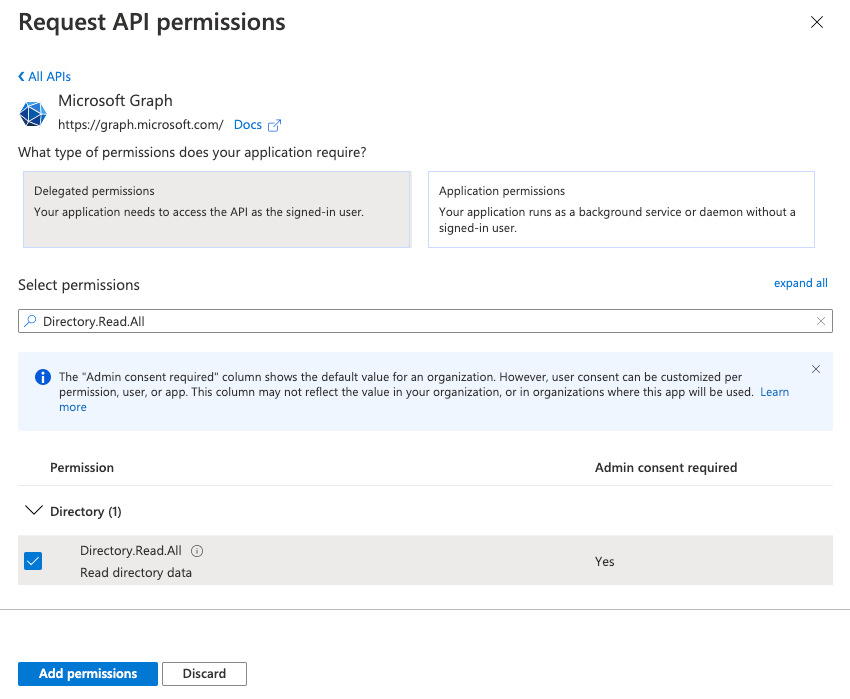
-
In the Select permissions section, add the following permissions:
Directory.Read.AllUser.Read
To add the permissions:
- Enter the permission name into the Search box.
- Locate the permission in the results and check the box next to its name.
- Repeat steps 1-2 for both permissions.
- When finished, click Add permissions.
When the changes have been saved, you’ll be redirected back to the API permissions page.
- On the API permissions page, click Grant admin consent for [YOUR_APP_NAME].
- When prompted, click Yes to grant consent for the app’s permissions.
Step 1.5: Grant users access to the app
The last step to configuring the app is to grant access to users in your Azure AD instance. This ensures that they’ll be able to access Stitch via SSO.
Using the process your organization follows, grant Stitch Azure AD app access to your colleagues.
Step 2: Connect to Stitch
Navigate back to the page where your Stitch account is open.
- In Stitch, scroll down to the Connect to Stitch section of the Azure AD setup page.
- Click Upload SAML Metadata.
- Locate and select the SAML metadata (Federation Metadata XML) file you downloaded in Step 1.3.3.
Step 3: Activate SSO
When finished, click the Activate SSO button.
Next steps
After you’ve enabled SSO for your Stitch account, remember to grant Stitch access to users in your Azure AD instance, if you haven’t already.
| Related | Troubleshooting |
Questions? Feedback?
Did this article help? If you have questions or feedback, feel free to submit a pull request with your suggestions, open an issue on GitHub, or reach out to us.