Learn to create and manage Import API access tokens in the Stitch web app.
Note: This guide is specific to Import API access tokens. For info about Stitch Connect API credentials, refer to the Connect API documentation.
Import API access tokens and integrations
Import API access tokens are specific to the Import API integration they are created for. This means that data successfully pushed using a given Import API access token will only ever be loaded into the schema or dataset created for that integration.
For example: You create an Import API integration named Customer Records, which has a corresponding destination schema named customer_records. Any data pushed to the Import API made using the access token associated with the Customer Records integration will only affect the data in the customer_records schema.
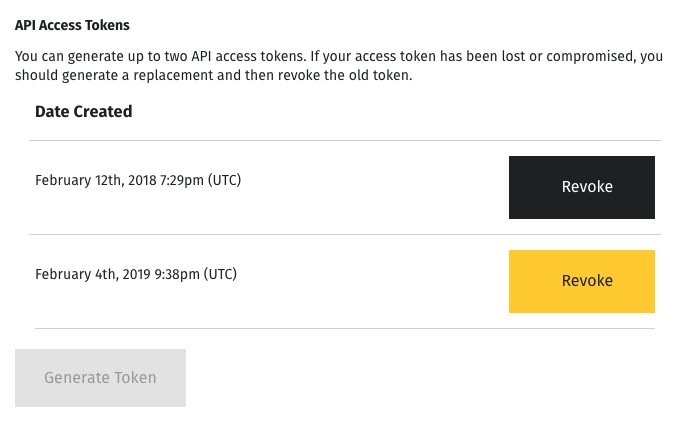
Each Import API integration is allowed a maximum of two active API access tokens at a time. This ensures that you can rotate your Import API access tokens when needed without interrupting replication.
Refer to the Import API authentication reference for more info.
Generate a new Import API access token
- Sign into your Stitch account.
- From the Stitch Dashboard page, click Add Integration.
- Click the Import API icon.
-
Enter a name for the integration. This is the name that will display on the Stitch Dashboard for the integration; it’ll also be used to create the schema in your destination.
Note: Schema names cannot be changed after the integration has been saved.
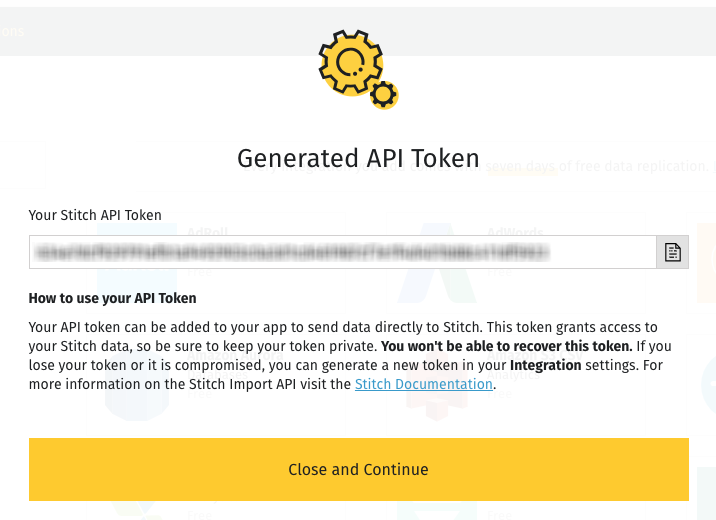
- Click the Save and Generate Token button to generate and display the token.
- Copy the token.
Note: Stitch will only display the access token once, so be sure to save it before clicking Close and Continue. If you forget to copy the token or misplace it, you can create a replacement and revoke the original token.
Revoke an existing Import API access token
If you need to revoke a token, we recommend first creating a second token and updating your application with it to prevent interruptions. Note: Any requests you attempt to send to Stitch during the time an invalid token is in use must be re-sent once valid a token is in place.
After you’ve updated the token in your application, you can revoke the old token.
- Sign into your Stitch account.
- From the Stitch Dashboard page, click the Import API integration you need to revoke a token from.
- On the Integration Details page, click the Settings tab.
- Locate the API Access Tokens section.
- If you’ve already generated a replacement token, click the Revoke button next to the token you want to revoke.